The Editor — Layout & Essential Tools
The EscapeMaker editor has five distinct regions that each handle a different part of building your game. This tutorial gives you a complete map of the interface and teaches you the essential skills you'll use constantly: placing objects, selecting them, adjusting properties, managing layers, aligning things neatly, and undoing mistakes.
What You'll Learn
- The names and purpose of all 5 editor regions
- How to navigate between scenes
- How to place Sprites, Text, Buttons, and Shapes
- How to select, move, and multi-select objects
- Every field in the Property Panel
- How to reorder objects using the Layer Panel
- How to align and distribute multiple objects
- Undo and redo with keyboard shortcuts
The 5 Regions
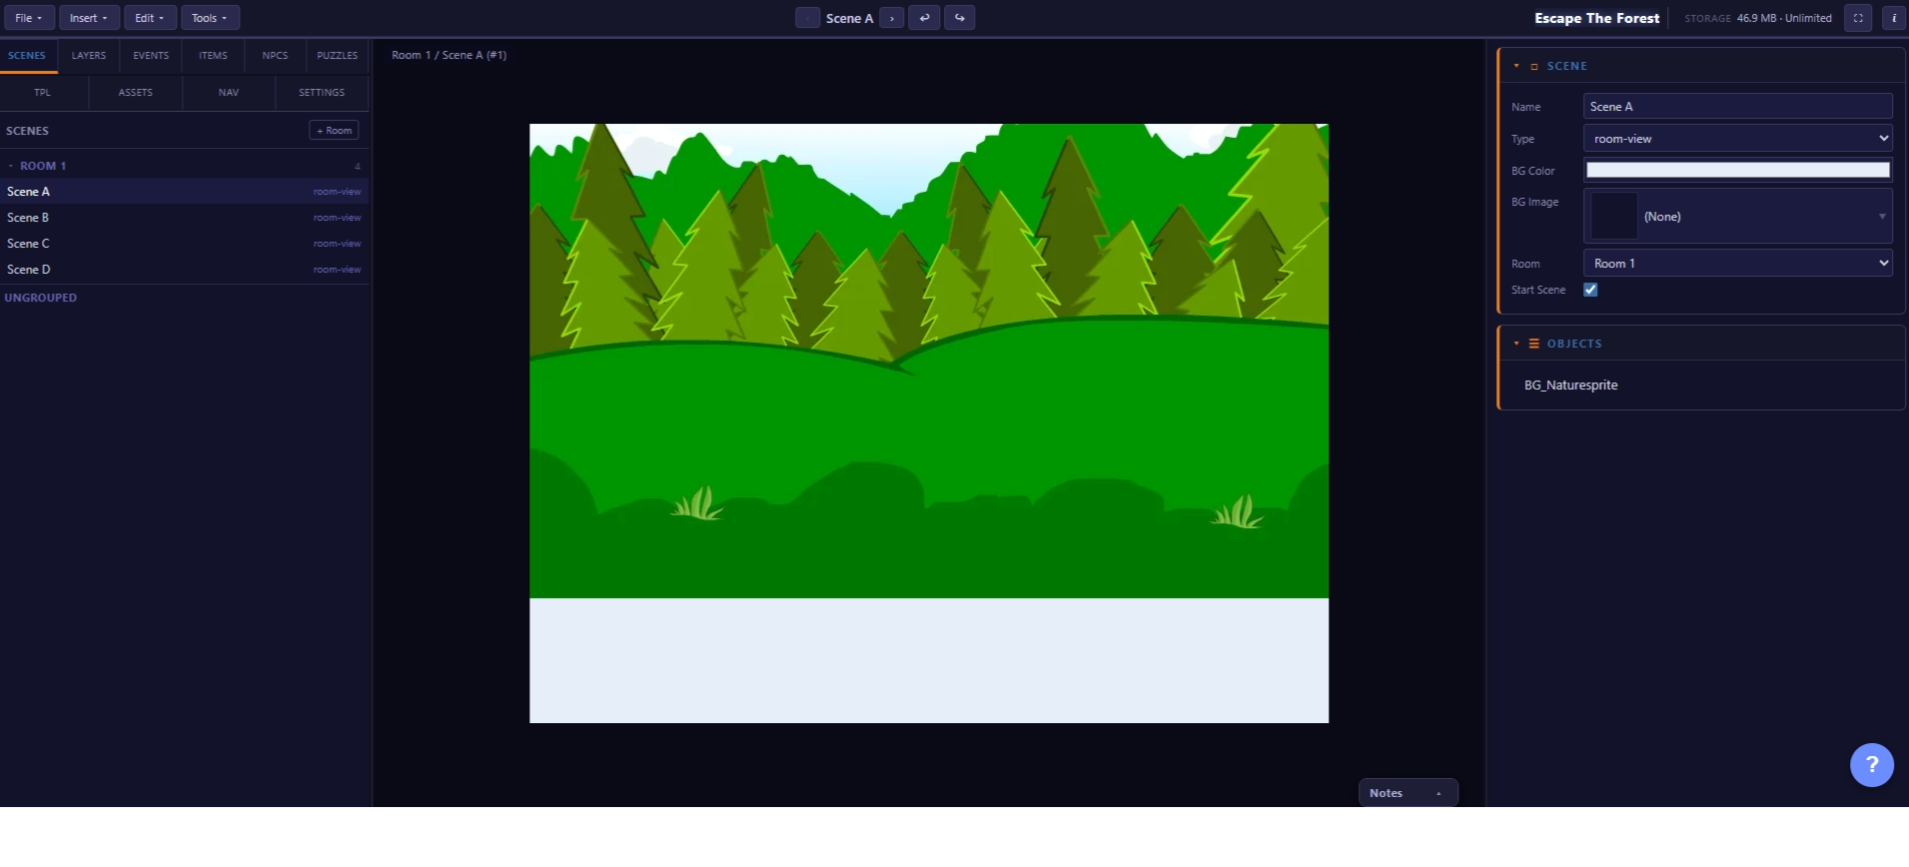
Every part of the EscapeMaker editor fits into one of five regions. Learning these names now will make the rest of the documentation much easier to follow.
(tabbed)
Pixi.js render
(tabbed)
Region 1 — Top Toolbar
The toolbar spans the full width at the top of the editor. From left to right it contains:
- File menu — Save, Save As, Export, and New Game.
- Insert menu — Add objects to the current scene: Sprite, Text, Button, Shape, Scene.
- Tools menu — Alignment tools (Align Left, Align Right, Align Center Horizontal/Vertical, Distribute Horizontally, Distribute Vertically), plus grid snap settings.
- Scene navigation arrows — A left arrow (◀) and right arrow (▶) that step backward and forward through your scene list one scene at a time, in the order shown in the Room Panel.
- Game name display — Shows the current game name in the toolbar center. Click it to quickly rename the game.
- Test button — Launches your game in a new browser tab for live testing.

Region 2 — Left Panel (tabbed)
The left panel contains six tabs selectable via icons or labels along the top edge of the panel:
| Tab | What it Shows |
|---|---|
| Room Panel | Collapsible tree of all rooms and the scenes inside each room. Click a scene to navigate to it. |
| Layer Panel | All objects in the current scene listed by their stacking order (z-index). Drag to reorder. Click the eye icon to toggle visibility. |
| Asset Panel | Your game's uploaded images and audio files. Drag an image from here onto the canvas to place it as a Sprite. |
| Inventory Panel | Shows all collectible items defined in the game. Used when building inventory-based puzzles. |
| Template Panel | Pre-built object groups (a combination lock, a jigsaw panel, etc.) you can drop into any scene. |
| Scene Map | A bird's-eye node diagram of every scene, with lines showing navigation connections. Drag nodes to lay out your game's structure visually. |
Region 3 — Canvas
The large central area is the canvas — a live Pixi.js render of the current scene. The canvas shows:
- The scene's background image (or solid color if none is set)
- All objects placed in the scene, at their exact positions and sizes
- Blue selection outlines around selected objects
- A dashed orange outline showing the game's target resolution boundary
Region 4 — Right Panel (tabbed)
The right panel also has tabs, though these are context-sensitive — some tabs only show useful data when a specific object is selected:
| Tab | What it Shows |
|---|---|
| Property Panel | Transform (X, Y, W, H, Rotation, Scale), Opacity, Filters, Interactive toggle, and Object Name for the selected object — or scene-level properties when nothing is selected. |
| Navigation Panel | Direction links (Left, Right, Up, Down, Back scene), hotspots, and the Is Start Scene toggle for the current scene. |
| Puzzle Panel | Attach a puzzle type (code lock, sequence, hidden object, etc.) to the selected object or scene. |
| Event Panel | Add event triggers and actions to the selected object (click to show/hide, click to play sound, etc.). |
| Game Settings Panel | Global settings: game resolution, navigation arrow style, title screen settings, background music, and more. Not object-specific. |
| Dev Notes | A free-text scratchpad attached to the current scene. Notes are not visible in the published game. |
Region 5 — Status Bar
A slim bar at the very bottom of the editor shows the current canvas zoom level, the mouse cursor's X/Y coordinates over the canvas (useful for precise placement), and a "Saved" / "Unsaved changes" indicator.
Navigating Scenes
There are three ways to switch which scene is displayed on the canvas:
Method A — Toolbar Arrows
Click the ◀ (Previous) or ▶ (Next) arrows in the toolbar. The editor steps through scenes in the order they appear in the Room Panel — Room 1 first, top to bottom, then Room 2, and so on.
Method B — Room Panel Click
Open the Room Panel tab on the left. Click any scene name in the tree. The canvas instantly updates to show that scene. The active scene is shown with a subtle highlight in the Room Panel list.
Method C — Scene Map Click
Open the Scene Map tab on the left. Each scene is a node. Click any node to navigate to it. This is especially useful in large games where scrolling the Room Panel list would take a while.
Placing Objects
You can add four kinds of objects to any scene. Use the Insert menu in the toolbar, or the keyboard shortcuts listed below.
| Object Type | Insert Menu | Shortcut | What It Is |
|---|---|---|---|
| Sprite | Insert → Sprite | S | An image object. Can display any image from your Asset Panel or the library. |
| Text | Insert → Text | T | A rendered text label. You control font, size, color, and wrapping. |
| Button | Insert → Button | B | A clickable button with label text and configurable hover/active states. |
| Shape | Insert → Shape | H | A solid filled rectangle, circle, or polygon. Great for invisible hotspot zones. |
What Happens When You Insert
Regardless of which method you use, the new object:
- Appears centered on the visible canvas area
- Is immediately selected (blue outline visible)
- Appears at the top of the Layer Panel list (in front of all existing objects)
- Its properties are shown in the Property Panel on the right
A new Sprite will show a placeholder checkered pattern until you assign an image to it. A new Text object shows the placeholder string Text in a default style. A new Button shows the label Button.
Assigning an Image to a Sprite
With a Sprite selected, look at the Property Panel on the right. Near the top you'll see an Image field showing the current image path (or "none"). Click the folder icon next to it to open the Asset Picker. Choose an image from your uploaded assets or from the library. The sprite updates immediately on the canvas.
Alternatively, open the Asset Panel tab on the left and drag an image thumbnail directly onto the canvas. This creates a new Sprite pre-assigned to that image at the drop position.
Selecting & Moving Objects
Single Selection
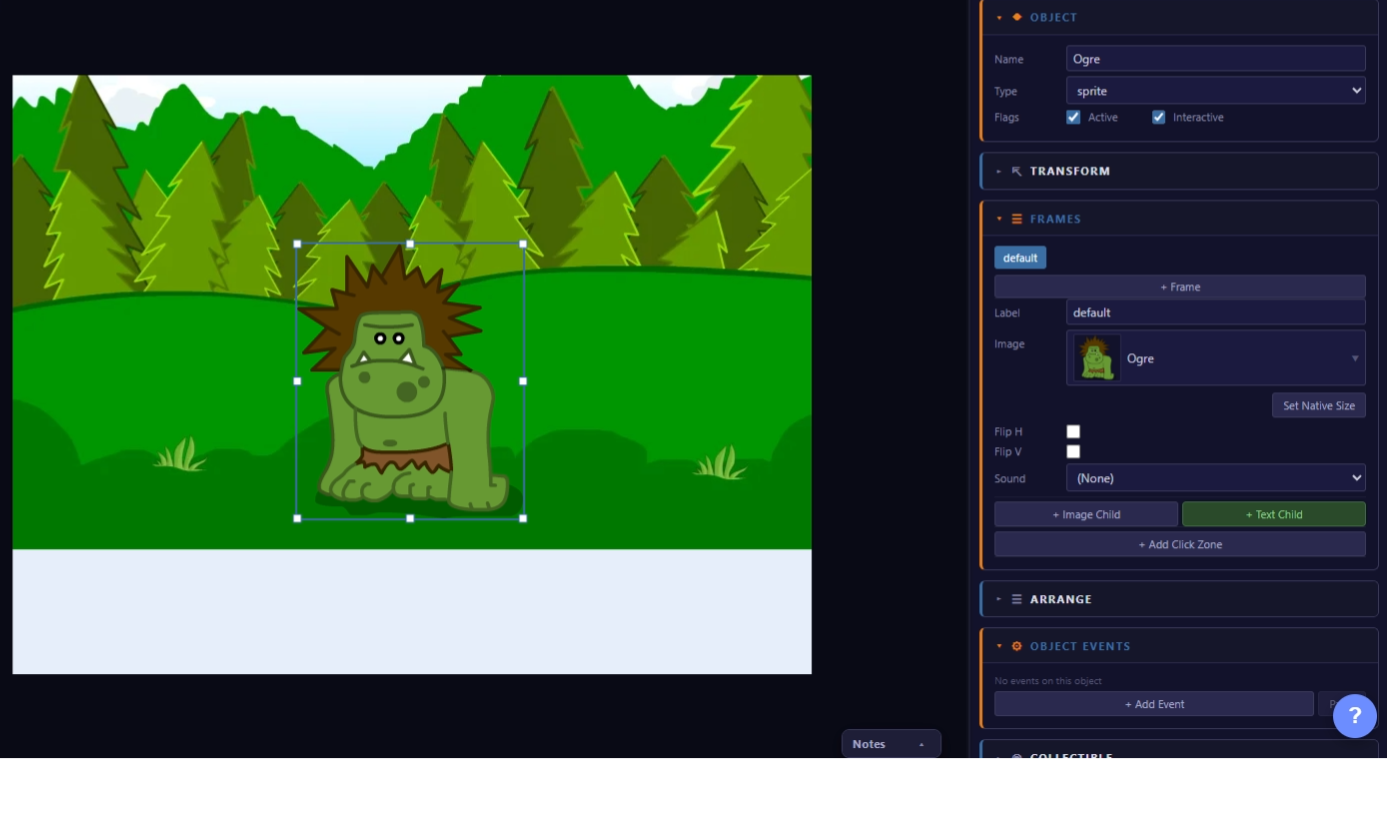
Click any object on the canvas to select it. A blue outline with eight resize handles appears around the object's bounding box. The object is also highlighted in the Layer Panel list, and the Property Panel on the right updates to show its properties.
Click anywhere on the canvas background (not on an object) to deselect all objects.
Dragging to Move
Click and hold on a selected object, then drag. The object follows your cursor. Release to drop it at the new position. The X and Y coordinates in the Property Panel update in real time as you drag.
Multi-Selection
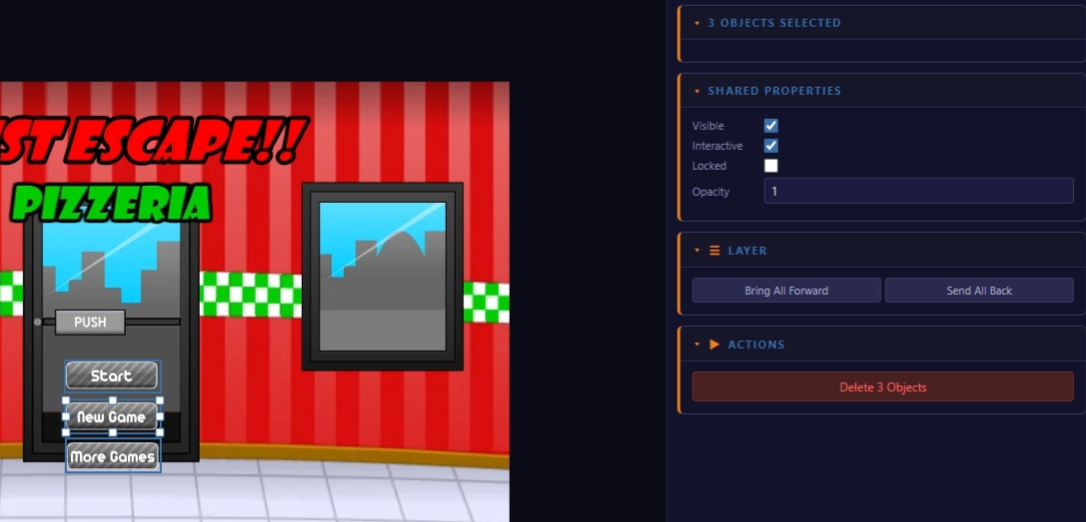
Hold Shift and click additional objects to add them to the selection. All selected objects show individual blue outlines. You can then drag any one of them to move the entire group together, maintaining their relative positions.
You can also click and drag on empty canvas space to rubber-band select: a dashed selection rectangle appears as you drag, and any objects whose bounding box is fully inside it are selected when you release.
Nudging with Arrow Keys
With one or more objects selected, use the keyboard arrow keys to nudge their position:
| Keys | Movement |
|---|---|
| ← ↑ → ↓ | Move 1 pixel in that direction |
| Shift + Arrow | Move 10 pixels in that direction |
Nudging is the most precise way to fine-tune positioning without typing coordinates in the Property Panel.
Resizing
Drag any of the eight blue handles on the selection outline to resize the object. Corner handles resize both width and height simultaneously. Edge handles resize only one dimension. Hold Shift while dragging a corner handle to constrain the aspect ratio.
The Property Panel
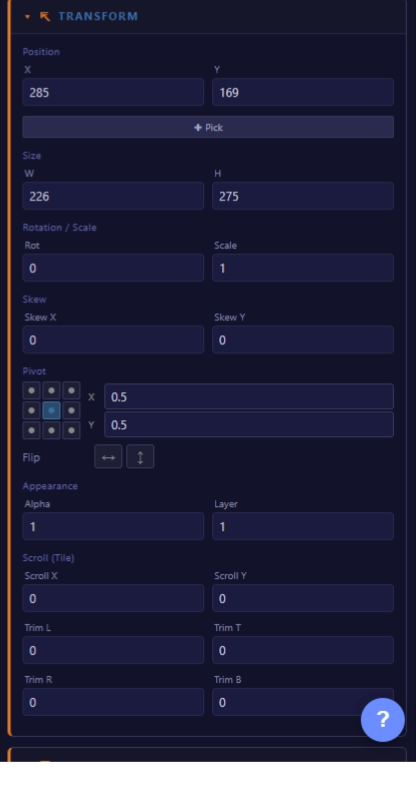
The Property Panel is the right panel's first tab, and the one you'll use most often. When an object is selected, it shows every configurable attribute for that object. When nothing is selected, it shows scene-level settings instead.
Object Name
The very first field at the top of the Property Panel is the Object Name. By default objects are named generically (sprite_1, text_2, etc.). Always rename objects to something descriptive as soon as you place them.
door, key_under_mat, or safe_dial make event setup dramatically easier.Transform Fields
| Field | Description |
|---|---|
| X | Horizontal position of the object's left edge, in pixels from the left of the canvas. |
| Y | Vertical position of the object's top edge, in pixels from the top of the canvas. |
| Width | The object's rendered width in pixels. |
| Height | The object's rendered height in pixels. |
| Rotation | Clockwise rotation in degrees (0–360). |
| Scale X / Scale Y | Multiplicative scale. 1.0 = 100%, 2.0 = 200%, 0.5 = 50%. Unlike Width/Height which are absolute pixels, Scale multiplies the object's base size. |
Every number field can be edited by:
- Clicking and typing a new value, then pressing Enter
- Clicking and dragging left/right to scrub the value up or down (like a slider)
- Scrolling with the mouse wheel while hovering over the field
Opacity
The Opacity field (0–100%) controls how transparent the object is. At 100% the object is fully visible. At 0% it is completely invisible but still exists on the canvas and can still be clicked (if Interactive is on). At 50% the object is semi-transparent and objects behind it show through.
Filters Section
Click the Filters heading to expand a list of Pixi.js filter effects you can apply to the object: Blur, Brightness, Contrast, Grayscale, Sepia, Color Matrix, Glow, and Drop Shadow. Each filter has its own sliders. Multiple filters can be stacked on one object. These render in real time on the canvas.
Interactive Toggle
The Interactive toggle at the bottom of the Property Panel controls whether the object responds to mouse/touch events (hover, click). It must be ON for any Event Panel actions attached to this object to fire in-game. Objects that are purely decorative should have Interactive turned off to avoid accidental clicks during gameplay.
Layers (Z-Order)
Every object in a scene has a z-order — a stacking depth that determines which objects appear in front of or behind others. Z-order is managed entirely through the Layer Panel tab in the left panel.
Reading the Layer Panel
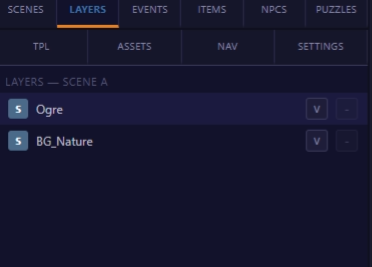
Objects are listed in the Layer Panel from top to bottom, where:
- Items at the top of the list are drawn in front (highest z-order)
- Items at the bottom of the list are drawn behind everything else (lowest z-order)
When you select an object on the canvas, its corresponding row in the Layer Panel is highlighted. When you click a row in the Layer Panel, that object becomes selected on the canvas.
Reordering Layers
Click and drag any row in the Layer Panel to a new position. The canvas updates instantly to reflect the new drawing order. This is the primary way to fix "my object is hidden behind something" issues.
You can also use the right-click context menu on the canvas: Bring to Front moves an object to the top of the list; Send to Back moves it to the bottom.
Showing and Hiding Objects
Each row in the Layer Panel has an eye icon (👁) on the right side. Click it to toggle the object's visibility in the editor. A closed eye means the object is hidden from view on the canvas, but it still exists and will still appear in the published game. Use this to temporarily hide objects that are obstructing your view while you work on objects underneath them.
Locking Objects
Each row also has a lock icon (🔒). Clicking it prevents the object from being moved or resized on the canvas. Locked objects can still be selected and have their properties edited via the Property Panel — they just can't be dragged. Lock your background sprite immediately after placing it so you don't accidentally nudge it.
Alignment Tools
When you need multiple objects to line up precisely — a row of buttons, a grid of icons, evenly-spaced clues — the alignment tools save you from manually typing X/Y coordinates. Find them in the Tools menu in the toolbar.
First, select 2 or more objects (Shift+click or rubber-band). Then use any of these tools:
| Tool | Effect |
|---|---|
| Align Left | Moves all selected objects so their left edges align with the leftmost object's left edge. |
| Align Right | Moves all selected objects so their right edges align with the rightmost object's right edge. |
| Align Center (H) | Centers all selected objects horizontally relative to each other's combined bounding box. |
| Align Top | Aligns all top edges to the topmost object's top edge. |
| Align Bottom | Aligns all bottom edges to the bottommost object's bottom edge. |
| Align Center (V) | Centers all selected objects vertically relative to their combined bounding box. |
| Distribute Horizontally | Spaces the selected objects so the gaps between them are equal on the horizontal axis. |
| Distribute Vertically | Spaces the selected objects so the gaps between them are equal on the vertical axis. |
Undo / Redo
Every action you take in the editor is logged in an undo history. If you make a mistake — delete the wrong object, accidentally move something, apply the wrong filter — you can instantly reverse it.
| Action | Shortcut |
|---|---|
| Undo | Ctrl+Z |
| Redo | Ctrl+Y |
The editor stores up to 10 undo steps. Steps older than the 10th are permanently discarded as new actions are recorded.
What Can Be Undone
Most actions are undoable:
- Placing, moving, resizing, rotating objects
- Changing Property Panel values (X, Y, Opacity, etc.)
- Deleting objects
- Reordering layers
- Adding or removing events
- Alignment operations
Actions that cannot be undone include: renaming a game, deleting a scene, and uploading or deleting assets from the Asset Panel.
door in the Object Name field. Set its Opacity to 80. Press Ctrl+Z once — the opacity should revert to 100%. Press Ctrl+Y to redo and bring it back to 80%. Then right-click the object and select Duplicate. Verify the duplicate also shows as door with 80% opacity.