Scenes, Rooms & Navigation
A great escape game feels like a real space. Players click left and right to look around a room, click a door to enter a new area, and zoom into close-ups of interesting objects. This tutorial teaches you exactly how to build that sense of space: how to organize scenes into rooms, what scene types are available, and four different ways to connect scenes together so players can actually move through your game.
What You'll Learn
- The difference between Scenes and Rooms
- How to add scenes and rooms from the editor
- The three scene types and when to use each
- How to link scenes using direction navigation
- How hotspot navigation works and when to prefer it
- How to use click zones via Events for navigation
- How to read the Scene Map and spot connection problems
- How to rename scenes and rooms
Scenes vs. Rooms
Before you can wire up navigation you need to understand EscapeMaker's two-level hierarchy:
What Is a Scene?
A scene is a single full-screen view that the player sees. Everything the player interacts with — backgrounds, objects, buttons, puzzles — belongs to a scene. Only one scene is visible at a time. When a player navigates, they transition from one scene to another.
Think of a scene as one photograph taken inside a location. If you're building a Kitchen, and you want the player to be able to look left, look straight ahead, and look right, those are three separate scenes — three photographs of the same room from slightly different angles.
What Is a Room?
A room is a purely organizational container — a label that groups related scenes together. Rooms have no gameplay function. They do not appear in the published game. They exist only to keep the Room Panel tidy.
For example:
| Room Name | Scenes Inside |
|---|---|
| Kitchen | Kitchen Left, Kitchen Center, Kitchen Right, Drawer Close-up |
| Hallway | Hallway Main, Painting Close-up, Door Close-up |
| Study | Study Main, Bookshelf Close-up, Safe Close-up |
The Room Panel Tree
Open the Room Panel tab on the left panel. You'll see a collapsible tree with rooms as parent nodes and scenes as child nodes. Click the triangle/arrow beside a room name to expand or collapse its scene list. Click a scene name to navigate to it on the canvas.
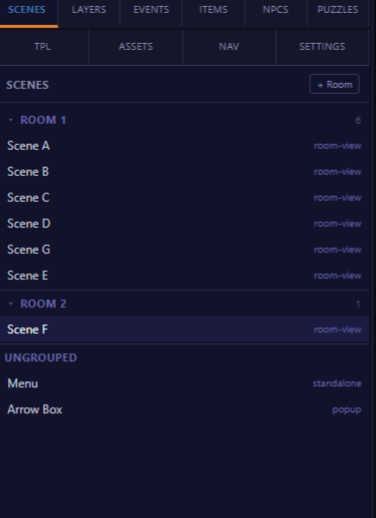
Scene Types
Every scene has a type that tells the engine how to present it to the player. The type affects which UI elements appear (arrows, back button, shop overlay) and how the engine treats navigation within that scene.
To view or change a scene's type, right-click the scene in the Room Panel and choose Scene Properties, or select the scene on the canvas and look in the Property Panel — the Scene Type dropdown appears at the top of the panel when no object is selected (scene-level properties mode).
Type 1 — room-view (Default)
This is the standard scene type. It renders as a full-screen room view. Navigation arrows automatically appear at the left, right, top, and bottom edges of the screen for any directions you've linked in the Navigation Panel. Most scenes in your game will be this type.
Use room-view for: main room angles, hallways, outdoor areas, any scene the player "stands in."
Type 2 — close-up
A close-up scene represents a zoomed-in detail view — the player has "leaned in" to examine something. Close-up scenes automatically display a Back button (typically a small arrow or ✕ in the corner) that returns the player to the previous scene. No left/right/up/down navigation arrows appear.
Use close-up for: drawers, safes, paintings, keyholes, control panels, any puzzle that needs the player to focus on a small area. A close-up scene should always have its Back navigation link set so the Back button works.
Type 3 — shop
A shop scene overlays the standard shop UI on top of whatever background you've set. The shop UI displays all collectibles the player has found and allows them to spend them on hints or bonus content (depending on how you've configured the shop in Game Settings). This type is used only once or twice in most games — typically accessible from a menu or a special object.
Use shop for: hint store, collectible redemption, bonus room unlock screen.
Adding Scenes & Rooms
Adding a Scene
There are two ways to add a new scene to your game:
- Insert menu → Scene — Adds a blank scene to the currently active room (whichever room contains the scene you're currently viewing).
- Right-click a room in the Room Panel → Add Scene — Adds a blank scene to that specific room, regardless of which scene is currently open on the canvas.
The new scene appears at the bottom of the room's scene list in the Room Panel, labeled with the next available letter in the sequence. The canvas switches to show the new (blank) scene.
Adding a Room
Right-click anywhere in an empty area of the Room Panel (not on a scene or room name) and choose Add Room. A new room is created with a default name like "Room 2". It starts empty — you'll need to add scenes to it.
Moving Scenes Between Rooms
In the Room Panel, click and drag a scene name and drop it onto a different room's header. The scene moves to that room. This is a purely organizational action — it does not affect navigation links or gameplay.
Renaming Scenes and Rooms
Double-click any scene or room name in the Room Panel to enter rename mode. Type the new name and press Enter to confirm, or Escape to cancel. Names can contain spaces and most characters.
Deleting a Scene
Right-click a scene in the Room Panel and choose Delete Scene. A confirmation dialog appears. Once deleted, the scene and all its objects and events are permanently removed. Any navigation links from other scenes that pointed to this scene are automatically cleared.
Direction Navigation (Navigation Panel)
Direction navigation is the simplest way to connect scenes. You specify what scene appears when the player clicks each edge of the screen. EscapeMaker automatically renders navigation arrows at those edges in the finished game.
Opening the Navigation Panel
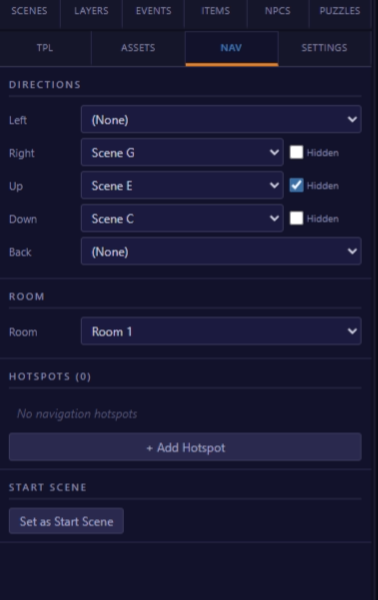
Navigate to the scene you want to set up links for. Make sure nothing is selected on the canvas (click an empty area). In the right panel, click the Navigation tab. You'll see five dropdowns:
| Dropdown | What It Controls |
|---|---|
| Left Scene | Scene the player goes to when they click the left arrow (left edge of screen). |
| Right Scene | Scene the player goes to when they click the right arrow (right edge). |
| Up Scene | Scene the player goes to when they click the up arrow (top edge). Less common, used for stairs or looking up. |
| Down Scene | Scene the player goes to when they click the down arrow (bottom edge). Used for looking down or going downstairs. |
| Back Scene | The scene the Back button returns to. Required for close-up scenes. |
Each dropdown lists all scenes in your game by name. Select the target scene from the list, or leave it at "None" if no arrow should appear on that edge.
Locking an Arrow Behind an Item
Once an arrow has a destination, you can gate it on an inventory item. In that arrow's row, set Needs item to the required item and type a blocked message. If the player tries to go that way without the item, they stay put and your message appears (for example, "The gate is locked. I need a key."). With the item, the arrow works normally. It's a quick way to control the order rooms are explored.
Making Navigation Two-Way
Navigation links are one-directional. If you set Scene A's Right Scene to Scene B, the player can go from A to B — but they cannot return from B to A unless you also set Scene B's Left Scene to Scene A. You must set both directions manually.
This is by design: it allows unusual layouts like one-way corridors or puzzle gates where you can only exit after solving something.
How Navigation Arrows Look In-Game
Navigation arrows are styled globally by the setting in Game Settings → Navigation Style. The three built-in styles are:
- Thin bar — A slim translucent strip along the screen edge. Subtle, minimal.
- Full bar — A wider, more prominent strip, easier to tap on mobile.
- Centered buttons — Circular arrow buttons centered on each edge. More classic escape-game style.
You can also customize arrow colors and opacity in Game Settings to match your game's visual style.
Hotspot Navigation
Direction arrows appear at the edges of the screen. But what if you want the player to click a specific object — a door, a window, a staircase — to move to another scene? That's what hotspots are for.
A hotspot is an invisible clickable zone you draw on the canvas. When the player clicks anywhere inside that zone, they are taken to the linked scene. There's no visible button or arrow — the player just discovers that clicking the door takes them somewhere.
Adding a Hotspot
- Navigate to the scene where you want to place the hotspot.
- Make sure nothing is selected. Open the Navigation Panel (right panel, Navigation tab).
- Scroll down to the Hotspots section. Click + Add Hotspot.
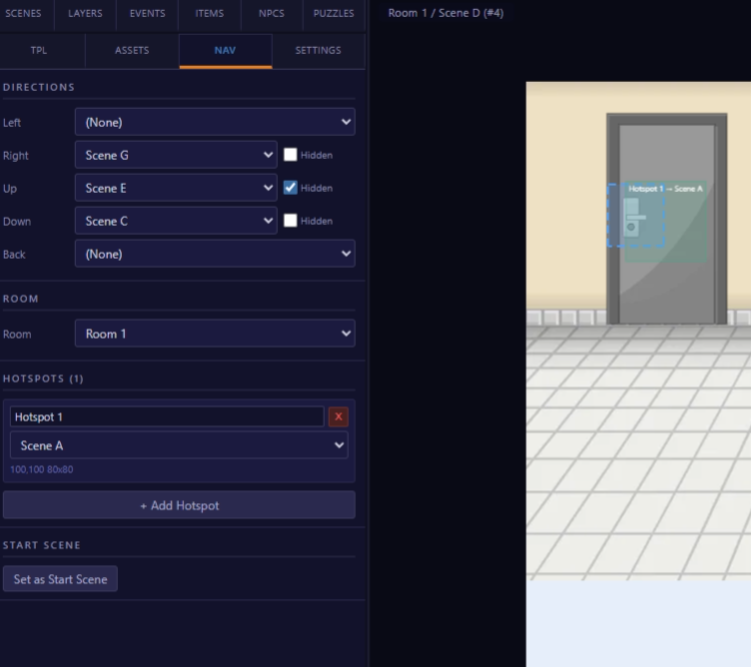
- A new hotspot entry appears in the list with default values: X=100, Y=100, Width=100, Height=100.
- Adjust X, Y, Width, Height to position the hotspot over the area you want clickable. You can type values directly or click "Edit on canvas" to drag a visual rectangle.
- Set the Target Scene dropdown to the scene the player should go to when they click this hotspot.
Positioning a Hotspot on the Canvas
Click Edit on canvas next to a hotspot entry. A dashed orange rectangle appears on the canvas representing the hotspot area. You can:
- Drag the rectangle to reposition it
- Drag the corner handles to resize it
When you're happy with the position, click anywhere else to deselect, and the hotspot coordinates update automatically in the Navigation Panel.
Multiple Hotspots Per Scene
You can add as many hotspots as you need. A single scene might have a hotspot over the door (→ Hallway), a hotspot over the window (→ Garden), and a hotspot over the safe (→ Safe Close-up). Each entry in the hotspot list is independent.
Hotspot vs. Direction Arrow — When to Use Which
| Situation | Best Approach |
|---|---|
| Player looks left/right through a panoramic room | Direction arrows (Left/Right navigation) |
| Player clicks a door to enter a new room | Hotspot over the door sprite |
| Player zooms into a drawer or safe | Hotspot over that object → close-up scene |
| Player goes upstairs (whole staircase clickable) | Hotspot over the staircase area |
| Back to a previous room from a close-up | Back Scene link (Navigation Panel) + Back button auto-renders |
Click Zones via Events
Hotspots (Step 5) are the fastest way to make a clickable navigation zone. But for more complex interactions — navigate only after solving a puzzle, play a sound before transitioning, show a message when clicking a locked door — you'll use the Event Panel instead.
The Event Panel lets you attach a Navigate to Scene action to any object's click event. You can also add conditions (e.g., "only navigate if puzzle X is solved") and chain multiple actions together (e.g., "play sound, wait 0.5s, then navigate").
Full event authoring is covered in the Intermediate track (INT 1: Events & Actions). For now, remember this decision rule:
The Scene Map
Once your game has more than a handful of scenes, the Scene Map becomes your most important planning tool. Open it via the Scene Map tab in the left panel.
Reading the Scene Map
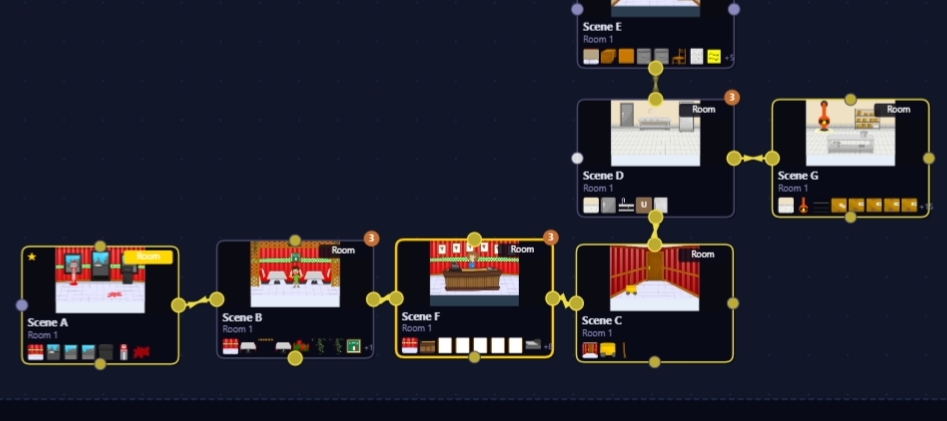
- Each node is one scene. It shows the scene name and a tiny background thumbnail.
- Lines between nodes represent navigation links. A solid line = direction link. A dashed line = hotspot link. The direction label (L, R, U, D, Back) is shown on the line.
- The start scene has a small green "Start" badge.
- A lock icon overlaid on a node means a puzzle is currently blocking one or more of its navigation links. The player cannot pass that link until the puzzle is solved.
- An unconnected node (no lines) is a scene the player can never reach from the start. This is usually a mistake — a scene you forgot to link.
Navigating from the Scene Map
Click any node to navigate to that scene on the canvas. The canvas, Room Panel, and all right panels update instantly. This is often faster than scrolling through the Room Panel list for large games.
Arranging Nodes
Drag any node to a new position. The layout is purely visual — moving a node on the Scene Map doesn't change anything about the scene or its links. Arrange the nodes to reflect your game's physical layout: put Kitchen scenes together, Hallway scenes in a row, etc. A well-arranged Scene Map makes it immediately obvious if a room is isolated or a connection is missing.
Spotting Problems
Do a quick Scene Map review before testing your game. Look for:
- Isolated nodes — scenes with no incoming connections. Players can never reach them.
- One-way links — a line going out of a scene with no return path. The player can enter but cannot leave without a back button.
- Dead ends — scenes with no outgoing links of any kind (no directions, no hotspots, no back). Only acceptable for the final scene of the game.
room-view scenes equally — you cannot style arrows differently per scene from the settings panel alone.