Your First Puzzle — Combination Lock
Puzzles are what make an escape game feel like an escape game. In this tutorial you'll add a Combination Lock to your scene, configure exactly how it looks and behaves, place a trigger object, and wire up two events — one to open the puzzle when the player clicks, and one to reward them when they solve it.
What You'll Learn
- Add a puzzle to a scene
- Configure Combination Lock settings
- Understand puzzle vs. trigger object
- Wire an "open puzzle" event on click
- Wire a "puzzle solved" reward event
- Test the full flow in the browser
What Is a Puzzle?
A puzzle in EscapeMaker is a mini-game overlay. It is not placed directly on the scene canvas like a sprite — instead, it lives in the Puzzle Panel and is summoned at runtime by an event. When the player triggers the event, the puzzle appears on top of the current scene in a modal overlay. The rest of the game is dimmed and frozen until the puzzle is dismissed or solved.
This separation — puzzle configuration in the Puzzle Panel, puzzle triggering via events — means the same puzzle could theoretically be opened from multiple different objects. It also means that creating a puzzle doesn't automatically put it in your game: you always need a trigger object and an event to make the puzzle reachable.
The Puzzle Panel
The Puzzle Panel is the tab labeled Puzzles in the right panel. It lists every puzzle in your game, regardless of which scene you're currently editing. A puzzle is a game-wide resource, not tied to any single scene.
Adding a Puzzle
- Click the Puzzles tab in the right panel.
- Click Add Puzzle.
- A dropdown appears listing all 9 Puzzle Types. Choose Combination Lock.
- A new entry appears in the puzzle list with a default name like "Puzzle 1".
- Click the name field and rename it to something descriptive — for this tutorial use SafeCode.
Configuring the Combination Lock
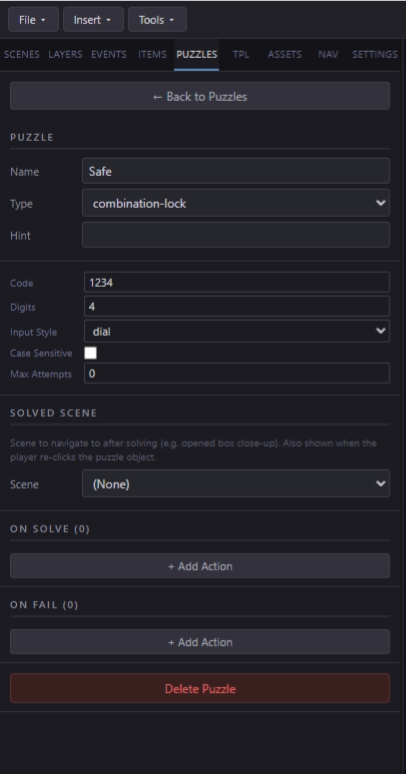
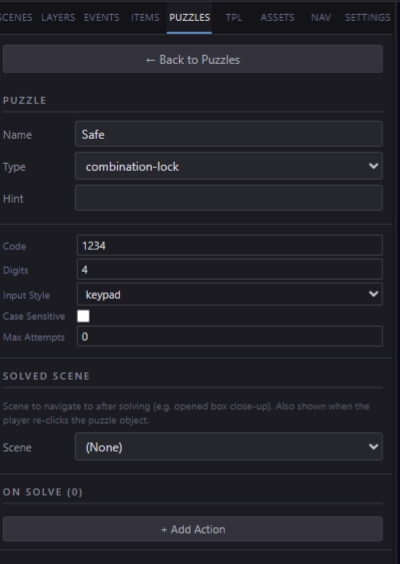
Click the gear icon on the "SafeCode" entry (or click the entry itself) to open its configuration panel. You'll see the following settings:
Style
Controls how the lock looks and how the player interacts with it. Four options:
| Style | Description |
|---|---|
| Dial | Rotating disc spinners — the classic combination safe look. Player swipes/clicks to scroll digits. |
| Keypad | A 4×3 numpad grid. Player taps digits in sequence to build the code. |
| Buttons | Up/down arrow buttons next to each digit. More tactile, great for physical-feeling interfaces. |
| Alpha | Letter input instead of numbers. Perfect for word puzzles — the solution can be a word like "ROSE" or "OPEN". |
For this tutorial, leave it on Dial.
Digits
How many characters make up the code. Range 1–8, default 3. Each additional digit increases difficulty significantly. Set this to 3.
Solution
The correct answer the player must enter. Type 742. This is case-sensitive for Alpha style. For Dial/Keypad/Buttons the engine only uses the numeric characters.
Show Clue
Optional text shown above the lock in the overlay. This is a hint to the player — for example: The year on the painting… Leave it blank for now, or add a clue if you have one.
Reset on Wrong
If checked, all dials/digits reset to zero whenever the player submits an incorrect code. This increases tension but can frustrate players on longer codes. Leave it unchecked for your first puzzle.
Image
Optional background image for the puzzle overlay — useful to place the lock visually inside a safe door, a padlock, or a custom frame. Leave blank for now to use the default overlay style.
Creating the Trigger Object
The puzzle needs something for the player to click. This is the trigger object — a sprite placed on your scene that represents the physical object the player examines to reach the puzzle. The puzzle and the trigger object are separate things: the puzzle is a game-wide overlay, the trigger is a scene-specific sprite.
- Navigate to the scene where you want to place the safe.
- Use Insert → Sprite and upload or choose a safe image from your asset library. Place it somewhere visible on the canvas.
- With the sprite selected, look at the Property Panel (right panel, Properties tab).
- Set the Name field to
safe. - Make sure Interactive is toggled ON. (This is on by default for sprites, but worth double-checking — only interactive objects can receive click events.)
Wiring the Event — Open Puzzle on Click
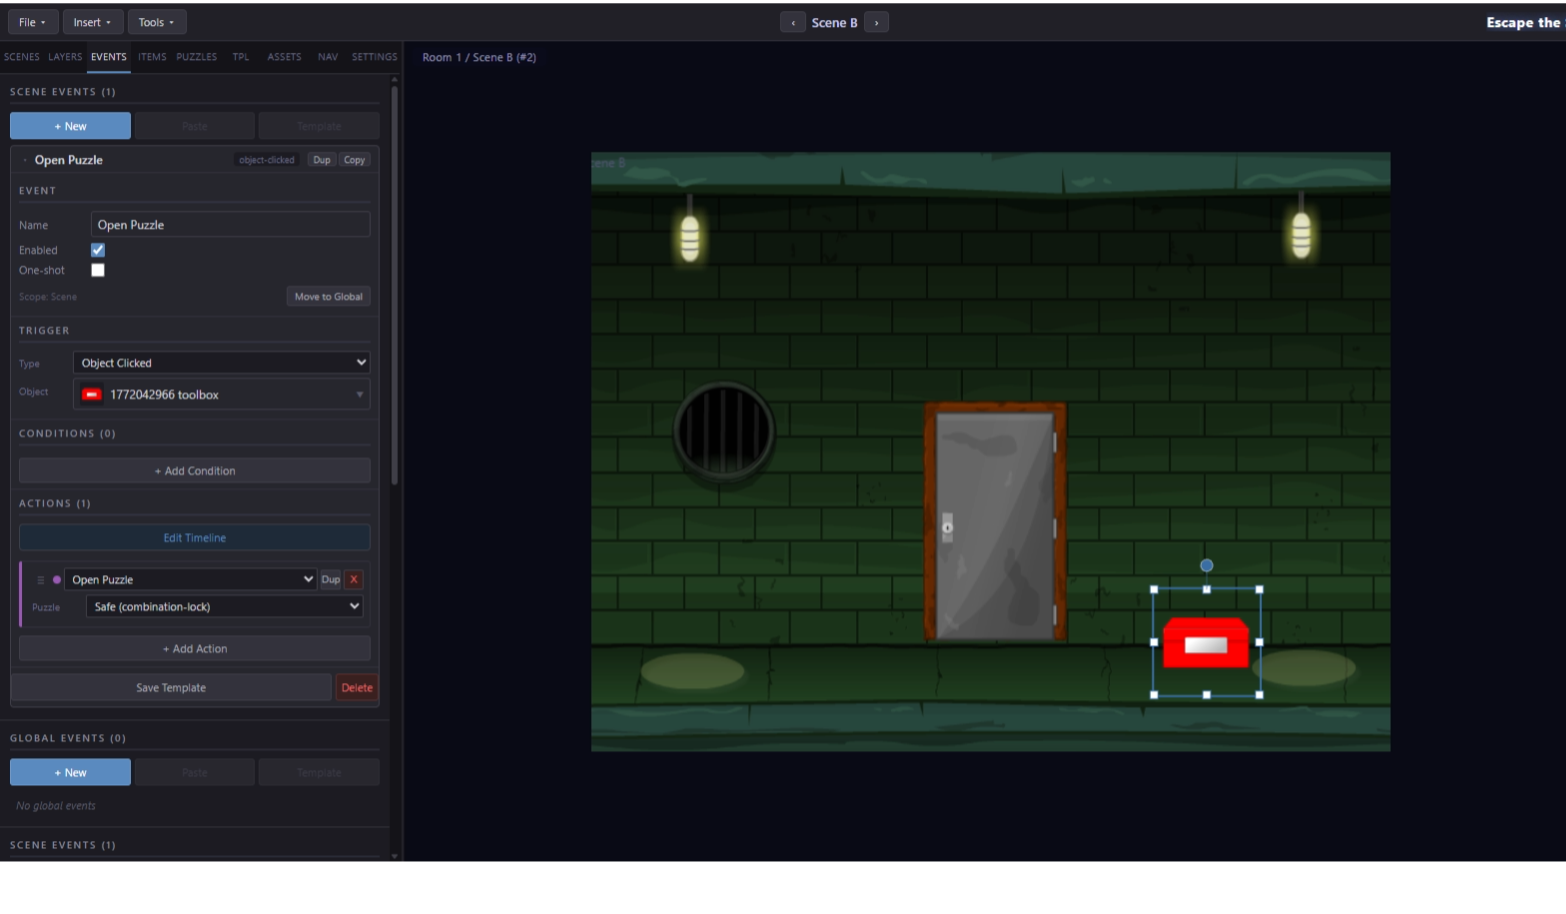
With the safe sprite selected on the canvas, open the Event tab in the right panel. Click Add Event.
Configure the Event
| Field | Value |
|---|---|
| Event Name | OpenSafe (optional but recommended) |
| Trigger | Object Click → select safe |
| Conditions | (none — leave empty) |
| Actions | Open Puzzle → choose SafeCode |
Click Save.
Wiring the Solved Event
Now you need to decide what happens when the player enters the correct code. In EscapeMaker, a solved puzzle fires the Puzzle Solved trigger — you hook your reward logic into that trigger.
First, prepare the reward: place a key sprite somewhere on your scene, name it reward_key, and in the Property Panel set its Visibility to Hidden. The key is on the scene but invisible until the safe is opened.
Now, with the safe sprite still selected, click Add Event in the Event tab again. (You can also click an empty area of the canvas first to deselect, then add a scene-level event — both approaches work for a Puzzle Solved trigger.)
Configure the Solved Event
| Field | Value |
|---|---|
| Event Name | SafeSolved |
| Trigger | Puzzle Solved → choose SafeCode |
| Conditions | (none) |
| Actions | Show Object → reward_key |
Optionally add more actions in sequence — for example, play a sound effect (Play Sound) or show a brief message (Show Dialogue with no speaker, just the text "The safe clicks open!"). Actions run top-to-bottom in the order listed.
Click Save.
Testing
Click the Test button in the toolbar (or press F5). Your game opens in a new browser tab using the built-in player.
- Navigate to the scene containing your safe sprite.
- Click the safe — the Combination Lock overlay should appear over the dimmed scene.
- Enter a wrong code. The dials should stay in position (since "Reset on wrong" is unchecked).
- Enter the correct code 742 and confirm. The overlay closes and the reward key sprite should appear on the scene.
Close the test tab to return to the editor. If something didn't work as expected, check these common issues:
| Symptom | Likely Cause |
|---|---|
| Clicking safe does nothing | Interactive is OFF on the safe sprite, or the "Open Puzzle" event wasn't saved |
| Puzzle opens but solving it does nothing | The "Puzzle Solved" event isn't saved, or the reward_key name doesn't match exactly |
| Key was already visible | Visibility wasn't set to Hidden on the reward_key sprite |
| Wrong puzzle opens | The Open Puzzle action points to a different puzzle — check the action's dropdown |