Creating Your First Game with the Wizard
The New Game Wizard walks you through naming your game, choosing how many scenes to create, picking background images from the library, and setting your start scene — all before you ever open the editor.
What You'll Learn
- How to open and navigate the New Game Wizard
- How to name your game and choose a scene count
- How scenes are labeled (A, B, C … Z, AA, AB …)
- How to pick background images from the global library
- How to use the search bar to filter library images
- How to designate a start scene
- What the wizard creates when you click Create Game
- Where your new scenes appear in the editor
Opening the Wizard
When you open EscapeMaker.io you land on the Project Picker — a grid of all the games you've created so far (or an empty state if you're brand new). To start a new game, click the large + New Game button in the top-right corner of the Project Picker.
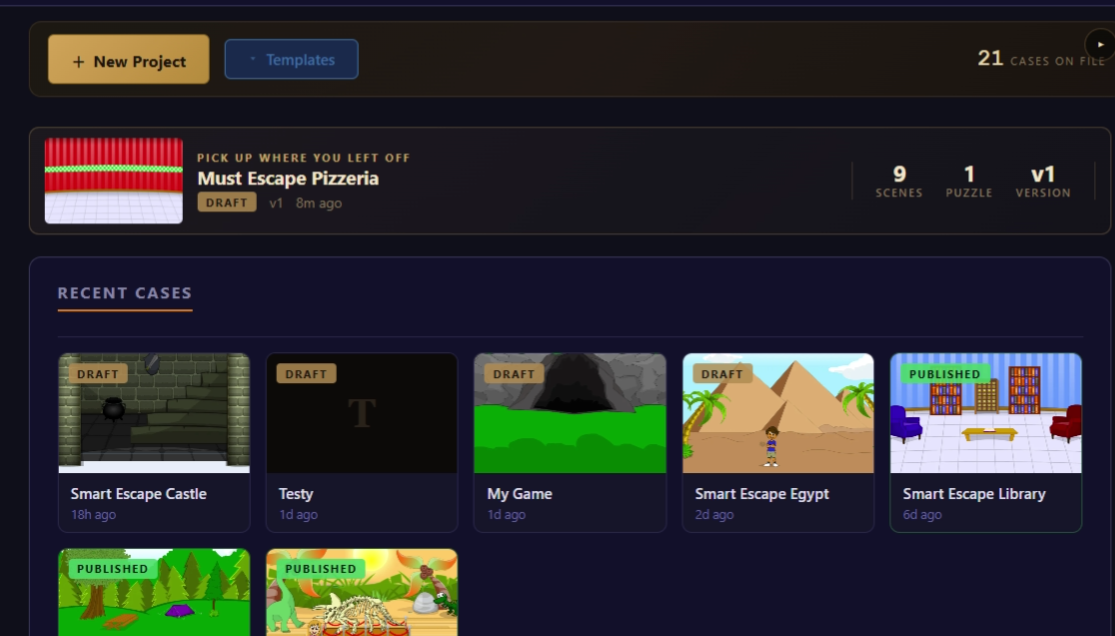
Clicking + New Game opens the New Game Wizard as a modal overlay — the rest of the UI dims behind it. You cannot interact with the editor until the wizard is completed or dismissed.
The 3-Step Progress Indicator
In the top-right corner of the wizard modal you'll see three numbered dots connected by a line:
The current step is highlighted (filled circle). Completed steps show a checkmark. You can click a completed step's dot to go back and revise it. You cannot skip forward past the current step.
Step 1 — Name & Scene Count
The first wizard step has two fields:
Game Name (required)
Type a name for your game in the Game Name field. This name appears in the editor's toolbar, in the Project Picker thumbnail, and in the exported game's browser tab title. It can contain letters, numbers, spaces, and common punctuation. You can rename the game later in Game Settings, so don't stress too much about it now.
Number of Scenes
Use the number spinner (or type directly) to set how many scenes the wizard will pre-create for you. The range is 1 to 100 and the default is 4. Every scene gets its own labeled slot in the background-picker step.
How Scenes Are Labeled
Scenes are automatically named using a letter sequence that mirrors spreadsheet column headers:
| Scene # | Label | Scene # | Label |
|---|---|---|---|
| 1 | A | 27 | AA |
| 2 | B | 28 | AB |
| 3 | C | 29 | AC |
| 26 | Z | 52 | AZ |
These labels are just defaults. You can rename every scene to something meaningful (e.g., Kitchen, Hallway) after the wizard finishes — double-clicking the scene name in the Room Panel does the trick.
When you're satisfied with the name and scene count, click Next to move to Step 2.
Step 2 — Pick Background Images
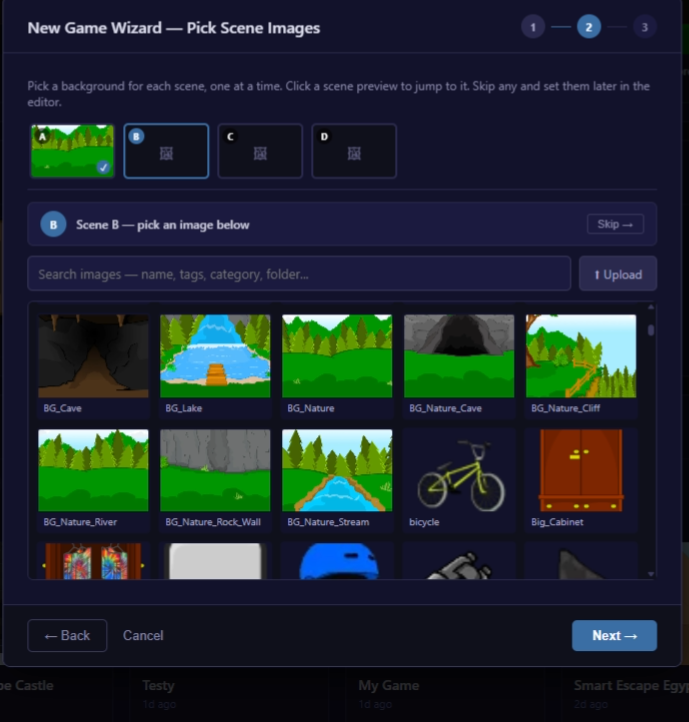
Step 2 shows a two-column layout. On the left is a scene list — one row per scene (A, B, C …). On the right is the global image library, a scrollable grid of every background image available on EscapeMaker.io.
Selecting a Scene to Assign
Click a scene row on the left (e.g., Scene B) to make it the active assignment target. The selected row highlights in the accent color.
Searching the Library
At the top of the library panel is a search bar. Start typing a keyword (e.g., kitchen, forest, office) and the grid filters in real time to show only matching images. Clear the search field to see all images again.
room-kitchen-01 or outdoor-forest-night. If you're not sure of the name, just type a theme word and browse visually.Assigning a Background
With a scene selected on the left, click any image thumbnail on the right. Two things happen immediately:
- The thumbnail gets a blue border and a checkmark ✓ overlay to confirm it's selected.
- The scene row on the left updates to show a small preview of that image next to the scene label.
To assign a different image, simply click another thumbnail — the selection moves automatically. Only one image per scene can be assigned at a time.
Clearing a Selection
If you want to leave a scene without a background (or you picked one by mistake), click the ✕ Clear button that appears below the selected thumbnail or at the top of the library panel when an assignment is active. The scene preview on the left reverts to a blank placeholder.
Skipping Scenes
Every scene assignment is optional. If you skip a scene, it will open in the editor with a solid dark background. You can assign or change backgrounds any time later by selecting a scene on the canvas and using the Background field in the Property Panel (right side), or via Scene Properties in the Room Panel.
Work through each scene row, assigning backgrounds as desired, then click Next to proceed to Step 3.
Step 3 — Set Your Start Scene
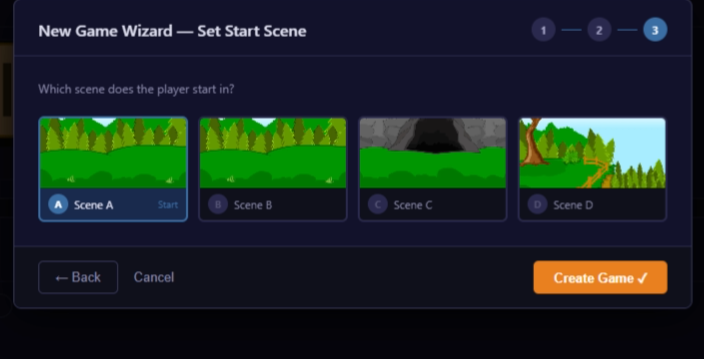
Step 3 shows a card grid — one card per scene. Each card displays the scene label (A, B, C …) and a thumbnail of the background image you assigned (or a blank placeholder if you skipped it). This grid is purely for choosing which scene the player lands on when the game first loads.
Selecting the Start Scene
Click any card to designate it as the start scene. The selected card receives:
- A purple border (distinct from the blue selection border in Step 2)
- A "Start" badge in the top-left corner of the card
Only one scene can be the start scene. Clicking a different card moves the "Start" designation to the new card automatically.
Click "Create Game ✓"
At the bottom of Step 3 is the final Create Game ✓ button (green, full-width). Clicking it triggers the following actions in order:
What the Editor Shows After the Wizard
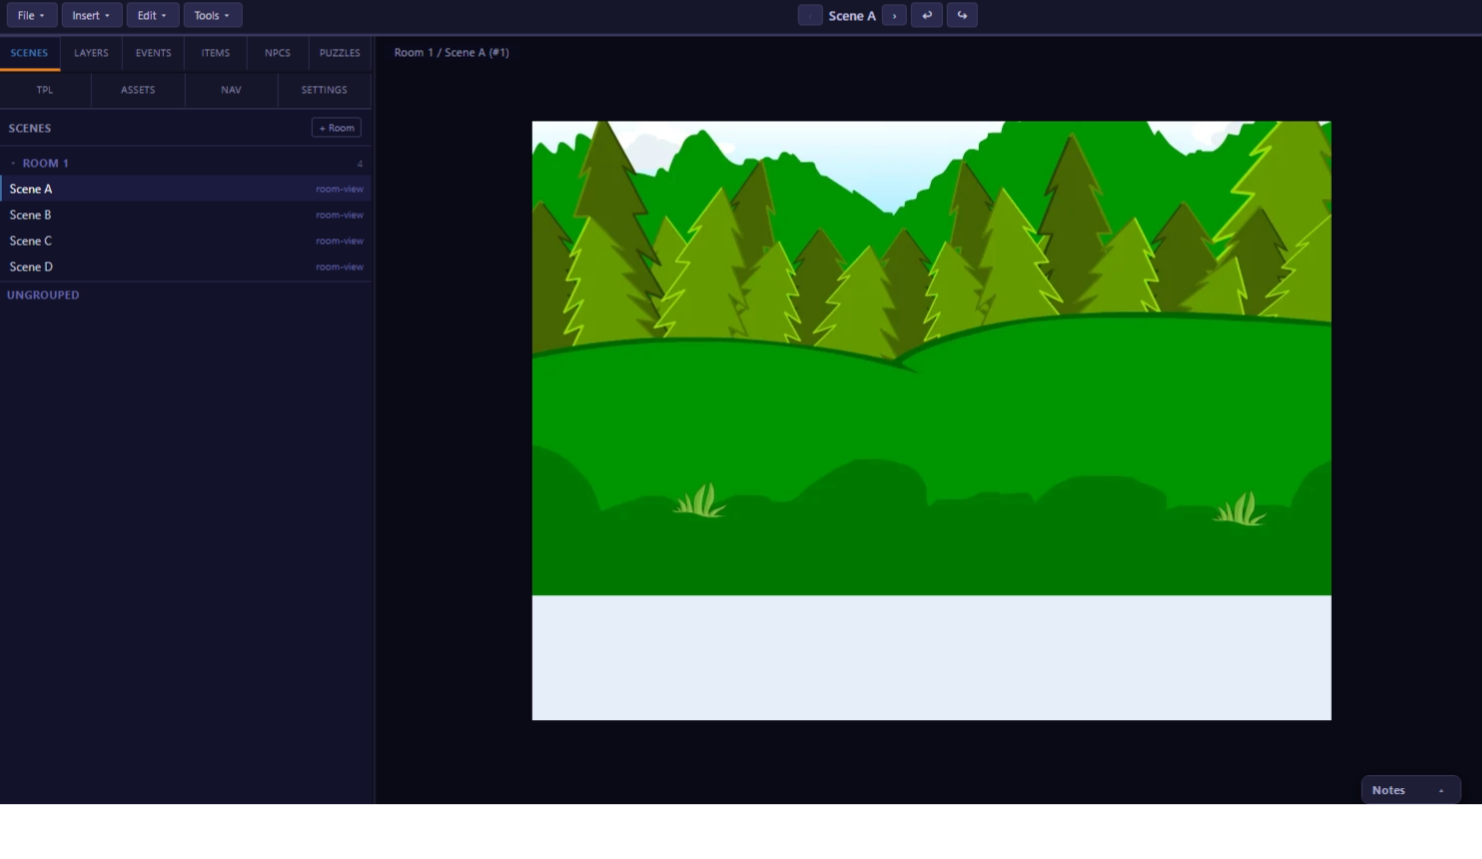
When the editor opens you'll see:
- Canvas: The start scene is displayed, with its background image filling the frame. There are no objects or navigation arrows yet — just the background.
- Room Panel (left): "Room 1" is listed as a collapsible group, with all your scenes (A, B, C …) nested under it in alphabetical order. Each scene shows a tiny thumbnail of its background.
- Scene Map tab (left panel): All scenes appear as draggable nodes arranged in a 6-per-row grid. No lines connect them yet because no navigation links have been set up.
- Layer Panel: Currently empty for each new scene — no objects have been placed.
- Property Panel (right): Shows the scene-level properties: background image, scene type (defaults to
room-view), and scene name.
What to Do Next
Your scenes exist but are completely isolated — clicking left/right arrows in-game would do nothing because no navigation links exist yet. The next tutorials walk you through:
- QS 2: The Editor — understanding the full layout and placing your first objects.
- QS 3: Scenes & Navigation — linking scenes together so players can move between rooms.