Visual Filters & Effects
- What filters are and how they work in EscapeMaker
- Apply filters to individual objects
- All available filter types and their parameters
- Use the Glow filter to signal interactivity
- Animate filter parameters via events
- Apply filters to scene backgrounds
- Performance considerations and mobile best practices
What Are Filters?
Filters are Pixi.js post-processing effects applied to individual objects or to the whole scene. They run on the GPU, which makes them fast — each filter takes the rendered pixels of an object and transforms them before displaying the final result.
Common uses in escape games:
- Make an interactive object glow to hint that it is clickable
- Blur a background to create a sense of depth
- Pixelate a TV screen sprite for a retro or glitch look
- Add a color tint to shift the mood of a scene (greyscale for a past memory, red tint for danger)
- Apply an outline to inventory items not yet collected so they stand out
Applying a Filter
Select any object on the canvas. In the Property Panel, scroll to the Filters section and click "Add Filter". A dropdown lists all available filter types — choose one to add it to the object.
Key things to know:
- Multiple filters can be stacked on a single object. They apply in order from top to bottom in the list — the output of one filter becomes the input for the next.
- Each filter shows its own parameter controls directly in the Property Panel beneath the filter name.
- Remove a filter by clicking the trash icon next to it.
- Drag the handle next to a filter name to reorder the stack.
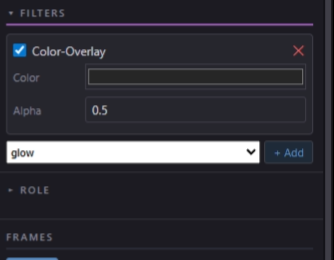
Filters stack top-to-bottom in the Property Panel. Add as many as needed.
Available Filters
The following filters are built into EscapeMaker:
| Filter | Parameters | Use Case |
|---|---|---|
| Blur | Strength (0–20) | Depth-of-field, fog, background defocus |
| Bloom | Threshold, brightness, blur | Glowing orbs, magical items, sunlight |
| Glow | Distance, outerStrength, innerStrength, color | Highlighted interactive objects |
| Color Matrix | Hue, saturation, brightness, contrast | Desaturate (greyscale), color grade |
| Pixelate | Size (1–20) | Retro TV, glitch effect, mosaic |
| Noise | Noise amount (0–1), seed | Film grain, static texture |
| Dot | Scale, angle | Comic-book halftone effect |
| Shockwave | Center, time, amplitude | Ripple/explosion visual burst |
| Outline | Thickness, color, offset X/Y | Highlight selected objects, cartoon style. Offset the line for a hand-inked or sticker look |
Glow for Interactivity
A very common and effective pattern: add a subtle Glow filter to interactive objects so players instinctively understand they can click them — without displaying an intrusive tooltip or hand cursor.
Recommended settings for a hint glow:
- outerStrength: 0.5–1.0 (subtle enough to not distract from the art)
- distance: 10–15px
- color: gold (
#e5a53a) or soft blue (#5599ff)
For a more obvious "this is important" glow — such as a key item the player is actively searching for — bump outerStrength to 2.0–3.0 and consider using a pulsing animation (see Step 5).
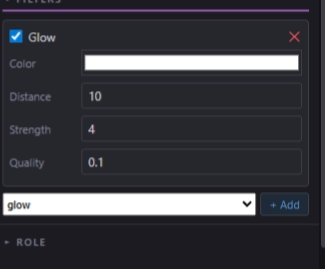
A subtle Glow filter draws the player's eye to interactive objects.
Animating Filter Parameters
Filter parameters are not static — you can change them at runtime using events. In any event's action list, choose the action "Set Filter Parameter", then select:
- The target object
- The filter name (e.g.
Glow) - The parameter to change (e.g.
outerStrength) - The new value
Combine this action with Timeline animations or a sequence of Wait + Set Filter Parameter actions to create continuous effects:
- Pulsing glow: Timeline keyframe outerStrength from 0.5 to 2.0 and back on a 1-second loop
- Fading blur: Wait 0ms → Set blur strength 10 → Wait 200ms → Set blur strength 7 → Wait 200ms → Set blur strength 0 (simulates focus pulling)
- Shockwave burst: On puzzle solve, set Shockwave time to 0 and animate it to 1.0 over 500ms for a visual explosion
Applying Filters to Scene Backgrounds
Filters are not limited to interactive objects — you can apply them to the background sprite of a scene just like any other object.
Effective background filter techniques:
- Blur the background (strength 3–6) while keeping foreground objects sharp — this creates a natural sense of depth and draws attention to interactive items.
- Dark Color Matrix on the background (reduce brightness to 0.4–0.6) while a foreground object has a Glow filter — the contrast pulls the player's eye directly to the glowing item.
- Desaturate the entire background (set Color Matrix saturation to 0) for a past-memory or ghost-world scene, while keeping a specific foreground object in full color for emphasis.
- Noise filter on background with a low noise amount (0.05–0.1) adds a subtle film-grain texture that makes flat background images feel more atmospheric.
Performance Notes
Bloom and Blur are the most GPU-intensive filters. Each one requires an additional render pass. Guidelines:
- Do not apply Bloom or Blur to more than 2–3 objects simultaneously on a single scene
- On mobile devices, keep total filter usage minimal — one or two lightweight filters (Glow, Outline, Noise at low values) is fine; stacked Bloom + Blur is not
- Use the Pixelate filter as a cheap alternative to Blur on low-end devices — it reads as "out of focus" at large sizes but costs far less GPU time
- Remove filters from objects that are hidden (
visible: false) — hidden objects with filters still incur some render cost
#aa55ff, outerStrength: 1.0). Then create a Timeline animation on the portal that keyframes outerStrength from 0.5 to 2.0 and back to 0.5 over a 1-second duration set to loop. The portal will pulse with a soft purple glow continuously.