State Variables & Advanced Conditions
- Define and configure custom state variables
- Set and increment state from event actions
- Write state-based conditions
- Implement the one-time intro pattern
- Build counter-based multi-step locks
- Use the State Changed trigger efficiently
- Understand persisted state and save data
What Are State Variables?
State variables are named key-value pairs stored in the game's runtime memory. Think of them as tracking flags or counters:
intro_shown = truelights_on = falselevers_pulled = 2
They let you track game progress far beyond the simple "has item" or "puzzle solved" conditions. With state variables you can build multi-step sequences, one-time events, conditional story branches, and cumulative counter puzzles — all without writing any code.
Defining State Variables
Navigate to Game Settings Panel → State Variables section. Click "Add Variable". Fill in three fields:
- Name / ID — A unique identifier, no spaces. Use underscores:
lights_on,intro_shown,levers_pulled. - Type — Choose Boolean (true/false) for on/off flags, or Number (integer) for counters.
- Default Value — The value when the game first starts. Boolean defaults to
false; Number defaults to0.
You can add as many variables as your game needs. They live in Game Settings, not inside any specific scene or object.
Setting State in Events
Two actions in the event action list modify state:
- Set State Variable — Choose a variable, then choose a new absolute value. For booleans: true or false. For numbers: any integer.
- Increment State Variable — Choose a number variable and an increment amount. Use positive numbers to count up, negative to count down. Example: each time the player pulls a lever, increment
levers_pulledby+1.
These actions can be combined with any trigger — a click, a scene entry, a puzzle solve, a timer — giving you full flexibility over when state changes.
Checking State in Conditions
When building conditions on an event, the state condition types are:
- State Equals — Variable matches an exact value. Example:
lights_onequalstrue. - State Greater Than — Number variable exceeds a threshold. Example:
levers_pulled> 2. - State Less Than — Number variable is below a threshold. Example:
levers_pulled< 3.
Conditions can be combined with AND logic — all conditions must pass for the event's actions to fire. Use this to build precise, multi-requirement triggers.
One-Time Events (Intro Pattern)
A very common need: show an introductory dialogue the first time a player enters a scene, but never again on subsequent visits.
Setup:
- Create a Boolean variable:
intro_A_shown, defaultfalse - Create an event on the scene:
- Trigger: Scene Entered
- Condition: State Equals —
intro_A_shown=false - Actions:
- Show Dialogue "You wake up in a strange room."
- Set State Variable —
intro_A_shown=true
On first entry, the condition passes, dialogue fires, and the flag is set to true. On every subsequent entry, the condition fails immediately — nothing happens.
Multi-Step Lock (Counter Pattern)
A door that only opens after exactly 3 buttons have been pressed:
Variable: buttons_pressed (Number, default 0)
Event per button (repeat for button1, button2, button3):
- Trigger: Object Click "buttonX"
- Conditions: none
- Actions: [Increment
buttons_pressed+1, Hide Object "buttonX"]
Unlock event:
- Trigger: State Changed —
buttons_pressed - Condition: State Greater Than —
buttons_pressed≥ 3 - Actions: [Show Object "door_open", Hide Object "door_closed", Show Dialogue "The door slides open!"]
Each button press increments the counter and hides that button. Once all three are pressed, the unlock event fires automatically.
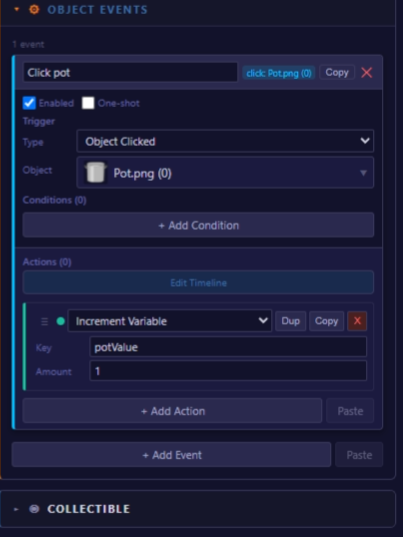
Increment State Variable — add +1 each time a button is pressed.
State Changed Trigger
The State Changed trigger fires whenever a specific state variable's value changes — regardless of what caused the change. This is more efficient and cleaner than checking state inside every click event.
Use it as a centralized "reactor" that watches a counter and responds when it hits a meaningful value. Because it only fires on change, it does not run constantly — there is no performance concern with many State Changed events.
You can have multiple State Changed events on the same variable with different conditions: one that fires at ≥1 (partial progress feedback), one at ≥3 (unlock), etc.
Persisted State
All state variables are included in the game's save file. If a player quits midway and returns later, every variable value is restored exactly as it was when they left.
Design variables to be meaningful as saved data:
- Good:
chest_opened,key_collected,scene_2_intro_seen - Avoid using state for purely visual or temporary effects that reset when a scene reloads anyway
kitchen_oven_on, lab_power_on, vault_code_entered.
lights_on and Lights_On are two completely separate variables. Stick to lowercase with underscores to avoid accidents.
switches_on, increment on each switch click, and use a State Changed trigger with condition ≥ 3 to reveal the box.