Templates — Reusable Objects & Events
- Create object templates from existing objects
- Stamp templates across multiple scenes
- Override per-instance properties
- Edit a template to update all instances at once
- Create and use event templates
- Decide when to use templates vs. copy-paste
Why Templates?
Imagine you have 10 scenes each containing a collectible coin sprite. Without templates, changing the coin's appearance means opening all 10 scenes and updating each object individually. With a template, you update once and every placed instance reflects the change immediately.
Templates are also ideal for consistent UI elements used across many scenes:
- "Examine" prompt buttons
- Scene transition overlays
- Recurring decorative elements (candles, floor patterns, wall sconces)
- Standard back/forward navigation buttons
Creating an Object Template
Configure an object on the canvas exactly as you want it — image, size, opacity, filters, and any visual properties. When it looks right:
- Right-click the object on the canvas
- Select "Save as Template"
- Give it a clear, descriptive name:
CoinCollectible,ExamineButton,WallCandle
The template is saved to this game's Template Panel immediately. The original object on the canvas becomes the first instance of this template.
The Template Panel
Open the Template Panel via the left panel tab. It lists all templates defined in this game. Each entry shows:
- Template name
- A small preview thumbnail
- Stamp button — place a new instance on the current scene
- Edit button — open the base template object for editing
- Delete button — remove the template definition
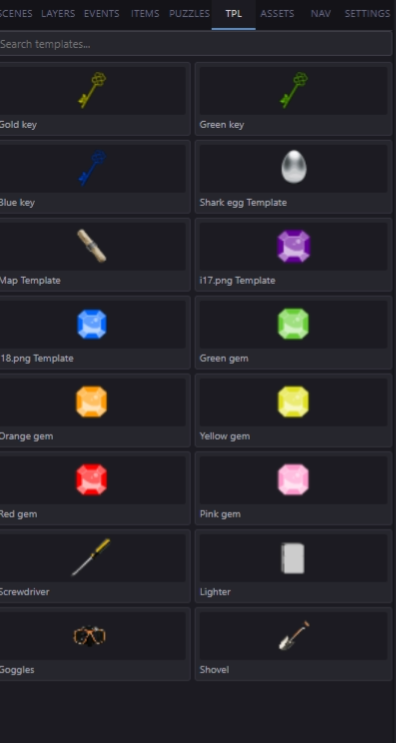
The Template Panel — stamp any template onto the current scene in one click.
Stamping Templates
Navigate to the scene where you want to place the object. In the Template Panel, click "Stamp" on the template you want. A new instance of that template appears on the canvas, linked to its parent template.
Once placed, you can:
- Move the instance anywhere on the canvas — position is always per-instance
- Rename the instance in the Property Panel for event referencing
- Visual properties (image, scale, opacity, filters) are inherited from the template unless overridden
Per-Instance Overrides
Select a stamped instance. In the Property Panel, properties that differ from the template show a small override indicator (a colored dot or asterisk). You can override:
- X, Y position
- Scale
- Opacity
- Visibility (hidden/visible on scene load)
Editing the Template
In the Template Panel, click "Edit" on a template to open the base template object in the editor. Changes you make here — swapping the image, resizing, adjusting opacity, applying a filter — propagate to every instance that has not overridden that specific property.
This is the main power of templates: a single edit updates your entire game. Common use cases:
- Swap out placeholder art with final art
- Resize a UI button that needs to be slightly larger everywhere
- Change an item's icon across all 15 scenes it appears in
Event Templates
Any event can be saved as an Event Template. In the Event Panel, right-click an event and select "Save as Event Template". Event templates store the entire trigger + conditions + actions combo.
To apply an event template to an object: open that object's Event Panel, click "Add from Template", and select the event template. Each stamped copy is independent — it is a copy of the event at the time of stamping.
When to Use Templates vs. Copy-Paste
| Situation | Use |
|---|---|
| Same visual, may need a global visual update later | Object Template |
| Same event behavior on many objects | Event Template (stamp) |
| A one-off variant with a completely different image | Copy-paste, then customize |
| Decorative elements used 10+ times across scenes | Object Template |
| Two objects that happen to look the same today but may diverge later | Copy-paste (keep them independent) |
CoinCollectible, NoteExamine, SceneTransitionOverlay are much easier to manage than Template1, Template2.