Scene Map — Visual Game Flow Planning
- Open the Scene Map and understand what it shows
- Read node connections and directional links
- Drag nodes to organize your map layout
- Spot lock icons that indicate puzzle gate-keepers
- Use the map to plan large games before building
- Identify isolated (orphan) nodes
- Understand what the map shows vs. what the Navigation Panel does
Opening the Scene Map
In the left panel, click the Scene Map tab. A canvas opens showing all scenes in your game as draggable rounded rectangles — called nodes. Lines between nodes represent navigation links (left, right, up, down, back). Hotspot links — where clicking an object in a scene takes the player to another scene — appear as dashed lines.
The Scene Map gives you a bird's-eye view of your entire game's structure at once. It is especially valuable when your game grows beyond a handful of scenes and you need to keep track of which rooms connect to which.
Reading the Map
Each node on the map displays three pieces of information:
- Scene name — the name you gave the scene in the Scene Panel.
- Scene type badge — a small label showing the scene type: room-view, close-up, or shop.
- Thumbnail — a small preview of the background image, if one is set for the scene.
The start scene is marked with a star icon in its top corner — this is the scene the player begins in.
Lines between nodes are directional. A line from scene A to scene B means that scene A has a navigation link pointing to B. Both ends of a two-way connection will show their own arrows. This makes it easy to spot one-way passages or dead-end scenes.
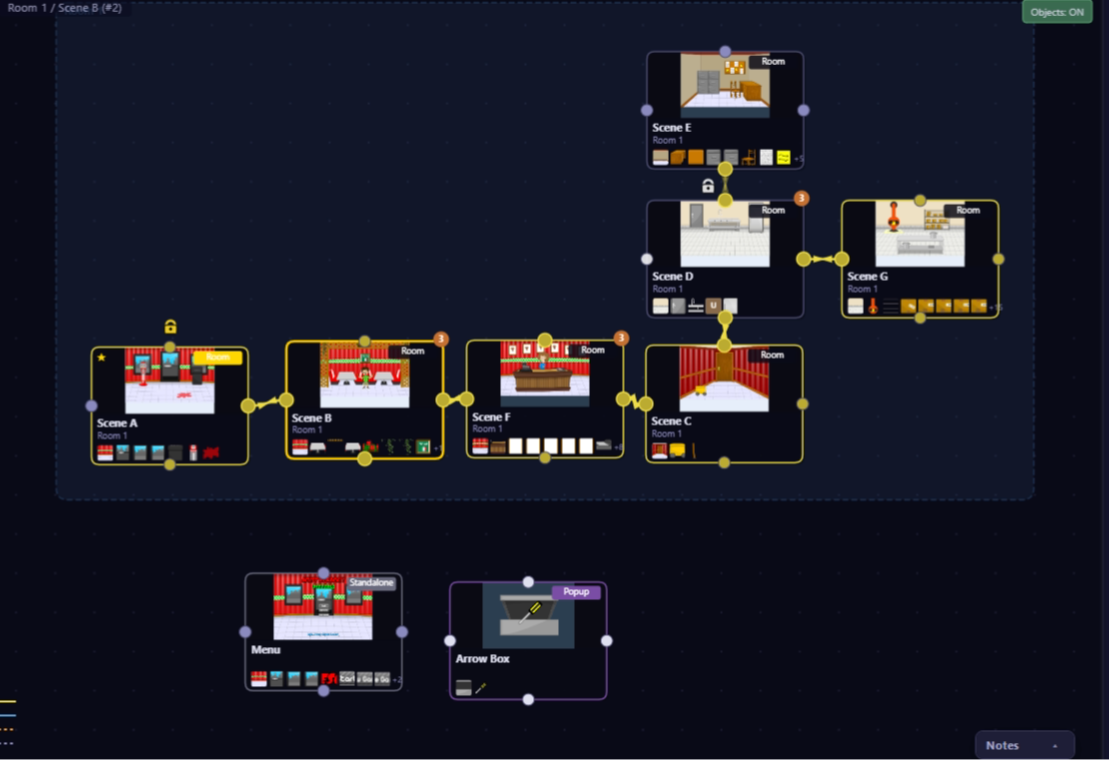
The Scene Map — see your entire game structure at a glance. Lock icon = puzzle gate.
Lock Icons
If a puzzle is blocking navigation — meaning there is a conditional event that gates a Navigate action so the player can only travel to the next scene after solving something — a padlock icon appears either on the scene node itself or directly on the connection line between the two scenes.
This is an extremely useful design tool. At a glance you can see:
- Which scenes are freely accessible vs. locked behind a puzzle
- Whether your game has a logical puzzle progression (locks should be intentional choke-points)
- Whether any locks were accidentally left on a connection (a common mistake during event editing)
Use the padlock icons to verify that your gate-keeper puzzles are exactly where you intended them in the flow.
Dragging Nodes
You can click and drag any node to reposition it on the map canvas. This is purely visual — moving a node has no effect on gameplay, connections, or scene order. It only changes where the node sits on the map diagram.
Use node dragging to organize your map to match the real-world spatial logic of your game. For example:
- Put kitchen scenes at the top-left and bedroom scenes at the top-right to mirror a floor plan
- Arrange basement or underground scenes at the bottom of the map
- Group close-up scenes near the room they belong to
- Separate hub scenes (like a hallway) from dead-end scenes (like a closet)
A well-organized map saves time when you return to a project after a break — you can immediately see the full structure without having to trace every connection.
Planning Before Building
For large games with 20 or more scenes, it pays to plan the Scene Map before building events. Use this workflow:
- Create all your scenes in the Scene Panel (names only — no backgrounds or events yet)
- Open the Scene Map and drag the blank nodes into a layout that matches your intended room structure
- Sketch out which connections should exist — think about which rooms lead where
- Add navigation links in the Navigation Panel to formalize the connections you planned visually
- The map updates live as you add navigation links, so you can confirm each connection as you build it
This top-down planning approach prevents a common mistake: building 15 scenes with full art and events, then realizing the room layout makes no spatial sense.
Isolated Nodes
A scene with no incoming or outgoing navigation links appears as a floating, unconnected node on the map — an island with no lines attached to it.
An isolated node is usually a mistake. Common causes:
- A scene was created but navigation links were never added to or from it
- Navigation links were deleted during editing and not replaced
- The scene was meant to be a hotspot destination but the hotspot event was forgotten
Players can never reach an isolated scene unless it is the start scene, which means any content inside it is invisible to them. The Scene Map makes these orphan scenes immediately obvious — look for nodes floating away from the main cluster and investigate whether they are intentional.
Scene Map vs. Navigation Panel
The Scene Map is a read-only diagram for connections. You cannot drag a line from one node to another to create a navigation link. The map reflects what you configure elsewhere — it does not let you configure it.
To add or change navigation links:
- Select the scene on the main canvas (or in the Scene Panel)
- Open the Navigation Panel in the right panel
- Set the Left, Right, Up, Down, and Back destinations there
- Switch back to the Scene Map to confirm the new line appears
Think of the roles this way: the Navigation Panel is where you write the rules; the Scene Map is where you read the result. Use both together — the map reveals problems that are easy to miss in the per-scene Navigation Panel view.