All 9 Puzzle Types — Complete Guide
EscapeMaker ships with nine distinct puzzle types covering the full range of classic escape room mechanics — from simple number codes to draggable jigsaw pieces to rotating pipe grids. This tutorial is your complete configuration reference for every puzzle type, with setup instructions, all available options, and design tips for each.
What You'll Learn
- Full config options for Combination Lock
- Full config options for Pattern Match
- Full config options for Sequence
- Full config options for Wires
- Full config options for Jigsaw
- Full config options for Item Slots
- Full config options for Slider Lock
- Full config options for Image Button
- Full config options for Pipe Rotation
Combination Lock
The Combination Lock is the most versatile and widely used puzzle type. The player must enter a correct code — numeric or alphabetic — by manipulating dials, pressing a keypad, clicking arrows, or typing letters.
Configuration Options
| Option | Description |
|---|---|
| Style | Dial — rotating disc spinners. Keypad — 4×3 numpad grid. Buttons — up/down arrow buttons per digit. Alpha — letter characters instead of digits. |
| Digits | Number of characters in the code. Range 1–8. Default 3. |
| Solution | The correct answer string. Numeric for Dial/Keypad/Buttons (e.g. "742"). Any string for Alpha (e.g. "ROSE", "OPEN", "EXIT"). |
| Show Clue | Optional text displayed above the lock in the overlay. Use as an in-puzzle hint or flavour text (e.g. "The year on the painting…"). |
| Reset on Wrong | If checked, all digits reset to zero/A when the player submits an incorrect answer. Increases difficulty significantly on 4+ digit codes. |
| Image | Optional background image for the puzzle overlay. Use to frame the lock inside a safe door, padlock shell, or decorative surround. |
Best for: Safe combinations, padlocks, PIN entry panels, keypad doors, word-based riddle answers.
Pattern Match
The Pattern Match puzzle presents the player with a grid of tiles. Each tile can be toggled on or off. The player must reproduce a hidden solution pattern by toggling the correct cells.
Configuration Options
| Option | Description |
|---|---|
| Grid Size | Dimensions of the grid: 2×2 up to 6×6. Larger grids are significantly harder. Start with 3×3 for beginners. |
| Solution Grid | Click cells in the editor's grid preview to mark which ones must be on in the solution. Filled/highlighted cells are ON; empty cells are OFF. |
| Tile Image (ON) | Optional image for a toggled-on tile. Defaults to a filled square. |
| Tile Image (OFF) | Optional image for a toggled-off tile. Defaults to an empty square. |
| Show Clue | Optional text shown above the grid. Can hint at the pattern (e.g. "Match the symbols on the wall"). |
Best for: Light-switch puzzles, illuminated tile patterns, symbol-matching, pixel art reveal puzzles where the solved pattern forms a picture or letter.
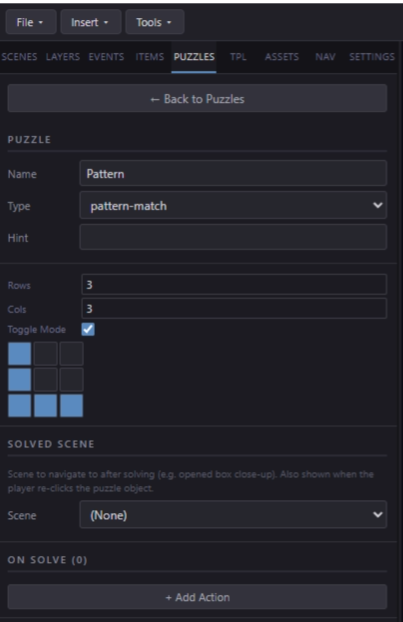
Click cells in the editor grid to define the solution pattern.
Sequence
The Sequence puzzle requires the player to click a set of objects in a specific order. Unlike other puzzle types, the "pieces" of a Sequence puzzle are your existing scene objects — you don't create new elements, you choreograph clicks on what's already on the scene.
Configuration Options
| Option | Description |
|---|---|
| Sequence List | An ordered list of scene objects. Click "Add Object" and choose from your scene's object names. The player must click them in this exact order. |
| Show Clue | Optional hint text shown at the top of the puzzle overlay (or on the scene itself — see tips below). |
| Reset on Wrong | If checked, clicking an object out of order resets the entire sequence back to step 1. |
Best for: Button sequences, color-order puzzles, musical note sequences, ritual step-by-step actions.
seq_btn_1, seq_btn_2, etc.Wires
The Wires puzzle presents a set of colored endpoints on the left side of the overlay and a corresponding set on the right side. The player must drag a "wire" from each left endpoint to its matching right endpoint.
Configuration Options
| Option | Description |
|---|---|
| Number of Pairs | How many wire connections to make. Range 2–6. Each pair has a left endpoint and a right endpoint. |
| Colors | Assign a color to each pair. The left endpoint and its matching right endpoint share the same color. Built-in color options include red, blue, yellow, green, orange, purple. |
| Shuffle Order | If checked, the right-side endpoints are shuffled into a random order each time the puzzle is opened, so the solution isn't always the same visual layout. Recommended for replayability. |
Best for: Electrical panel repairs, color-matching wiring tasks, circuit completion puzzles, telephone junction boxes.
The player drags from a left endpoint toward the right side. A colored wire draws behind the mouse/finger. When the line is released over the correct matching endpoint, the connection snaps into place and a success indicator appears. All pairs must be correctly connected to solve.
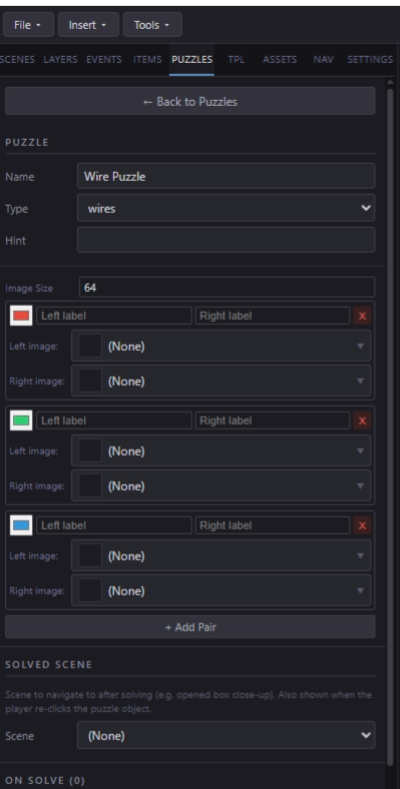
Define color pairs in the Wires config — the player connects matching endpoints.
Jigsaw
The Jigsaw puzzle takes a source image and slices it into a grid of scrambled pieces. The player drags pieces from a scrambled pool to their correct positions in the solution grid.
Configuration Options
| Option | Description |
|---|---|
| Source Image | The image to slice into puzzle pieces. Upload from your asset library. The engine automatically cuts it into the configured grid. Recommended minimum 400×400px for a sharp result. |
| Grid Size | How many pieces: 2×2 (4 pieces), 3×3 (9 pieces), or 4×4 (16 pieces). 2×2 is very easy; 4×4 is challenging for a casual player. |
| Snap Distance | How close to the correct position a piece must be dropped before it snaps in place. Larger values are more forgiving. Default is 30px. |
Best for: Torn photographs that reveal a clue, ripped maps, damaged paintings, scrambled family portraits, puzzle fragments that form a code.
Item Slots
The Item Slots puzzle displays a fixed number of slots on an overlay. Each slot requires a specific inventory item to be placed in it. When all slots are filled correctly, the puzzle is solved.
Configuration Options
| Option | Description |
|---|---|
| Number of Slots | How many slots to display. Range 1–8. |
| Required Item (per slot) | For each slot, choose which inventory item must be placed there. All defined inventory items appear in the dropdown. |
| Slot Positions | X/Y coordinates for each slot on the overlay. The editor provides a visual drag interface to position slots over a background image. |
| Slot Background Image | Optional image for the overlay background — typically an altar, machine, or container that contextualizes why items are being placed. |
Best for: Altar puzzles (place the correct gemstones), machine assembly (plug in the correct components), trophy shelves (place items in their spots), symbol placement puzzles.
The player interacts by dragging an item from the inventory bar and dropping it on a slot. If the item matches the slot's required item, it settles into the slot and the item icon appears there. If it doesn't match, the item returns to inventory. Once all slots are filled, the puzzle solves.
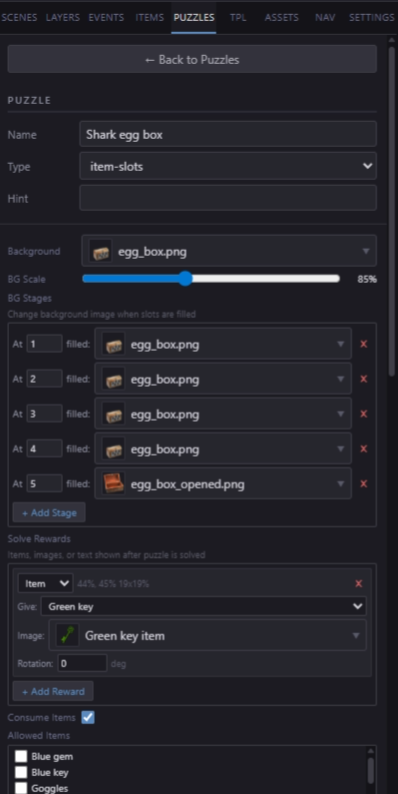
Each slot requires a specific inventory item — all filled correctly = puzzle solved.
Slider Lock
The Slider Lock presents a handle on a track. The player drags the handle to a target position. It's a simple but highly versatile puzzle that fits naturally into any physical or mechanical interface.
Configuration Options
| Option | Description |
|---|---|
| Orientation | Horizontal or Vertical. Horizontal fits valves and brightness controls; Vertical fits levers and temperature gauges. |
| Number of Positions | How many discrete "stops" the slider can land on. Range 2–10. The player snaps to the nearest position when they release the handle. |
| Solution Position | Which position number (1 = leftmost/bottom, N = rightmost/top) is the correct answer. |
| Position Labels | Optional text label for each position. Displayed near each stop on the track (e.g. "Off", "Low", "High", or "Cold", "Warm", "Hot"). Leave blank to show no labels. |
Best for: Thermostats, valve controls, voltage/brightness dials, water pressure gauges, security access levels, frequency tuners.
Image Button
The Image Button is the simplest puzzle type. It displays an image, and when the player clicks it, the puzzle is solved. There is no code, no matching, no sequence — just a single deliberate click.
Configuration Options
| Option | Description |
|---|---|
| Image | The image shown in the puzzle overlay before it's solved. Can be a button, lever, switch, or any visual element. |
| Solved Image | Optional alternate image shown after the player clicks. Gives visual feedback (e.g. a pressed button, a flipped switch, a pulled lever). If left blank, the original image stays. |
| Show Clue | Optional text shown above the image — can set the context ("Press the red button") or leave the player to infer. |
Best for: Pressing a single button, flipping a switch, pulling a lever, activating a device — any moment where the player takes a single deliberate action and something important happens as a result.
Pipe Rotation
The Pipe Rotation puzzle presents a grid of pipe tiles — straights, elbows, and T-junctions. Each tile is rotated to a scrambled starting angle, and the player taps a tile to rotate it 90° at a time. The puzzle is solved when every tile is turned back to the orientation you designed.
Configuration Options
| Option | Description |
|---|---|
| Grid Size | Number of rows and columns in the pipe grid. Larger grids mean more tiles to rotate and a harder solve. Start small (3×3) and grow from there. |
| Tiles | Set each cell to a Straight, Elbow, T-junction, or leave it empty (no pipe). Empty cells let you carve non-rectangular pipe runs through the grid. |
| Tile Rotation | For each tile, rotate it to the angle it should sit at when solved. This is the target the player has to find. Straights only have two meaningful positions (vertical / horizontal), so a straight can never be "180° wrong." |
| Pipe Art | Optional images for the Straight, Elbow, and T shapes. If you leave them blank, EscapeMaker draws clean fallback pipes automatically, so the puzzle works with zero art. |
| Background Image | Optional image behind the grid — a control panel, a wall, a machine face. The pipe tiles sit inset on top of it so any decorative frame stays visible. |
| Inlets & Outlets | Optional source/drain markers placed on the edges of cells (with optional images). They are purely decorative — they show the player where flow "starts" and "ends" but do not affect the solve. |
Best for: Plumbing and valve rooms, steampunk boilers, sci-fi coolant conduits, wiring and circuit runs — any "connect / restore the line" fantasy where rotating pieces into place feels right.
Puzzle Type Comparison
Quick reference for choosing the right puzzle type for your design goal:
| Puzzle Type | Best For | Setup Difficulty |
|---|---|---|
| Combination Lock | Safe codes, PINs, word riddles | ⭐ Easy |
| Pattern Match | Grid toggles, light switches, pixel patterns | ⭐⭐ Medium |
| Sequence | Button orders, ritual steps, color sequences | ⭐⭐ Medium |
| Wires | Color matching, circuit panels, cable routing | ⭐ Easy |
| Jigsaw | Torn maps, photographs, fragmentary clues | ⭐ Easy |
| Item Slots | Placing inventory items, altars, assembly | ⭐⭐ Medium |
| Slider Lock | Valves, thermostats, dials, levers | ⭐ Easy |
| Image Button | Simple triggers, switches, multi-step chains | ⭐ Easy |
| Pipe Rotation | Plumbing, valves, conduits, restore-the-line | ⭐⭐ Medium |