Inventory — Items, Combinations & Collectibles
Items are the currency of puzzle logic. A key you pick up in the kitchen unlocks the door in the hallway — that journey from discovery to use is what makes escape games satisfying. This tutorial covers the full inventory system: how to define items, make objects pickable, combine items into new items, use items on objects, scatter collectible coins and gems, and build a shop scene.
What You'll Learn
- The two inventory systems — items vs. collectibles
- How to define named inventory items
- Making scene objects pickable via events
- Using inventory items on scene objects
- Building item combination recipes
- Placing coins and gems as collectibles
- Setting up the shop scene type
- Item ID best practices
Two Types of Collectibles
EscapeMaker has two separate systems for things the player "picks up." Understanding which is which prevents confusion:
The two systems are entirely separate — a collectible coin is never in the inventory bar, and an inventory item is never counted in the collectible counter. You can use both in the same game.
| Inventory Items | Collectibles (Coins/Gems) | |
|---|---|---|
| Shown in | Bottom inventory bar | HUD counter (top or bottom) |
| Used by | Clicking item then object | Clicking the sprite (auto-collected) |
| Can be combined | Yes | No |
| Can be spent | By Remove action | In the shop scene |
| Drive events via | Object Use Item trigger | Item Collected trigger, Collectible Count condition |
Defining Inventory Items
Before any item can be picked up or used, it must be defined in the Inventory Panel. Defining an item registers it with the engine — it does not give the item to the player automatically.
- Click the Inventory tab in the left panel.
- Click Add Item.
- Fill in the item fields.
Item Fields
| Field | Description |
|---|---|
| Name | The display name shown in the inventory bar tooltip and in dialogue when the item is referenced. Example: Rusty Key. |
| ID | A short identifier used internally — in event triggers, conditions, and actions. Auto-generated from the name (spaces become underscores, lowercase), but you can override it. Example: rusty_key. Must be unique. |
| Icon Image | The image shown as the item's slot icon in the inventory bar. Upload from your asset library. Recommended: square, 64×64 or 128×128px, transparent background. |
| Description | Short text shown when the player hovers or taps an item in the inventory bar. One sentence is ideal. Example: "An old rusty key. What does it open?" |
rusty_key, blue_gem, torn_map are easy to search and remember.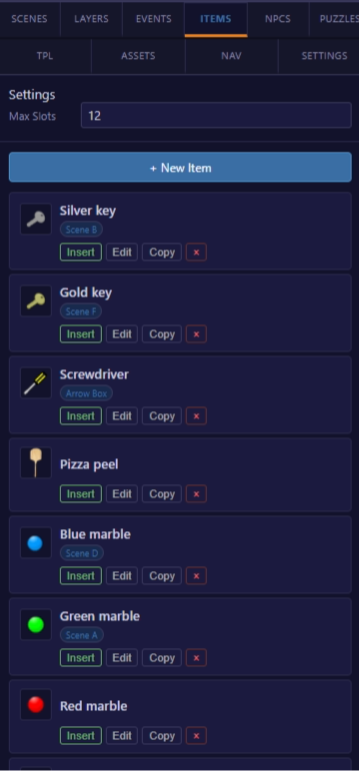
The Inventory Panel — define all items here before using them in events.
Making Objects Pickable
To let the player pick up an item from a scene, you place a sprite representing the item, then use an event to add it to inventory and remove the sprite when clicked. The sprite is the visual; the inventory item is the logical object.
- Place a sprite on your scene representing the item (e.g. a key image). Name it
key_sprite. Set Interactive to ON. - With the sprite selected, open the Event tab and click Add Event.
- Configure the event:
| Field | Value |
|---|---|
| Name | PickupKey |
| Trigger | Object Click → key_sprite |
| Conditions | Has Item "rusty_key" = false (prevents picking up twice) |
| Actions | Add Item to Inventory "rusty_key" → Hide Object key_sprite |
The condition "Has Item rusty_key = false" ensures the sprite only disappears once — if the player somehow clicks it again after already having the key, nothing happens. The Hide Object action makes the sprite vanish from the scene, simulating the item being picked up.
Using Items on Objects
Once an item is in the player's inventory bar, they can use it on scene objects. The player clicks the item in the bar to "hold" it, then clicks a scene object. If an event on that object has the matching "Object Use Item" trigger, that event fires.
Add the event to the target object (the object being used on — e.g. the locked door):
| Field | Value |
|---|---|
| Name | UnlockWithKey |
| Trigger | Object Use Item → door with item "rusty_key" |
| Conditions | Has Item "rusty_key" = true (safety check) |
| Actions | Remove Item from Inventory "rusty_key" → Show Dialogue "The door unlocks!" → Navigate to Scene "Hallway" |
What Happens When the Wrong Item Is Used
If the player uses an item on an object and no matching "Object Use Item" event exists for that combination, nothing happens — no feedback, no error. This is often fine for a few objects, but for important interactive objects it's good practice to add a catch-all event:
| Field | Value |
|---|---|
| Trigger | Object Click → door (plain click, no item required) |
| Conditions | Puzzle Solved "DoorLock" = false |
| Actions | Show Dialogue "The door is locked." |
This gives the player feedback when they click the door without the key — the game feels responsive rather than broken.
Item Combinations
Item combinations let you create crafting-style mechanics: two items in the player's inventory can be combined to produce a third, new item. All combinations are defined upfront in the Inventory Panel.
Adding a Combination
- Click the Inventory tab in the left panel.
- Click Add Combination.
- Set Item A and Item B to the two source items.
- Set Result to the item produced. (The result item must already be defined in the Inventory Panel.)
- Optionally set a Fail Message — text shown if the player tries to combine the items but something prevents it. In practice, if a combination definition exists and both items are present, it always succeeds — the fail message is shown for the reverse case (combining in the wrong order, or a future condition gate).
How the Player Combines Items
The player opens the inventory bar and clicks one item to hold it, then clicks a second item in the bar. If a combination exists for that pair, the two source items are removed and the result item is added automatically. No event needs to fire — the combination engine handles it.
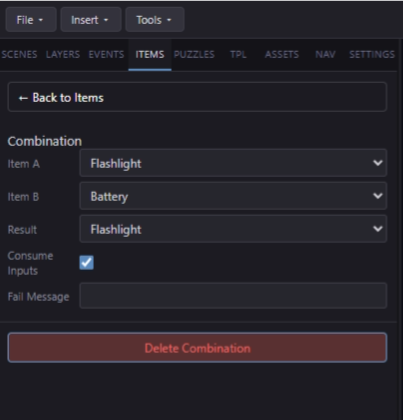
Combination editor — Item A + Item B = Result Item.
Collectibles — Coins & Gems
Collectibles are interactive sprites that the player clicks to collect. They increment a running counter displayed in the game HUD. Unlike inventory items, collectibles have a point value and don't appear in the inventory bar — they feed into the collectible counter used by the shop and by condition checks.
Placing a Collectible
- Place a sprite on your scene (use a coin or gem image from your asset library).
- With the sprite selected, go to the Property Panel.
- Check the Is Collectible toggle.
- Set Type: Coin or Gem.
- Set Value: the point value added to the counter when collected (default 1).
When the player clicks the sprite in the game, it disappears and the HUD counter increments by the item's value. You don't need to add any events — the collectible behavior is automatic once "Is Collectible" is checked.
Using Collectible Counts in Events
The Collectible Count condition checks how many collectibles the player has found. Use it to gate progress — for example, "only allow access to the final room if the player has collected all 10 gems." Add the condition to any event's condition list:
| Field | Value |
|---|---|
| Condition Type | Collectible Count |
| Type | Gem |
| Amount | 10 (or whatever the total in your game is) |
| Comparison | Greater than or equal to |
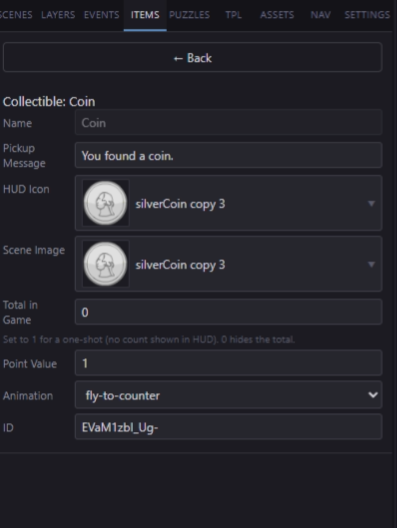
Enable Is Collectible on any sprite to make it a coin or gem pickup.
The Shop Scene
The shop lets players spend their collected coins or gems to purchase hints, unlock bonus content, or acquire special items. It uses a dedicated scene type that renders the shop UI automatically.
Creating a Shop Scene
- Add a new scene (Insert → Scene or right-click Room Panel → Add Scene).
- Right-click the scene in the Room Panel and choose Scene Properties.
- Set Scene Type to
shop. - Set a background image for the scene (optional — a shop backdrop illustration works well).
Configuring Shop Items
- Open Game Settings (toolbar → File → Game Settings, or the gear icon).
- Find the Shop section.
- Click Add Shop Item for each thing you want to sell. Options:
| Shop Item Type | Description |
|---|---|
| Inventory Item | Adds a defined inventory item to the player's bag when purchased. |
| Scene Unlock | Unlocks navigation to a normally inaccessible scene (bonus room, extra content). |
Each shop item has a price (in coins or gems) and a label. The shop scene renders the full shop UI automatically when the player visits that scene type — you don't need to build the UI manually.
Linking to the Shop
The shop scene is accessed the same way any scene is — via a hotspot, a navigation link, or a "Navigate to Scene" action in an event. A common pattern is to place a "Hint Shop" button sprite somewhere visible and wire it:
- Trigger: Object Click →
shop_button - Actions: Navigate to Scene → your shop scene